Introduction
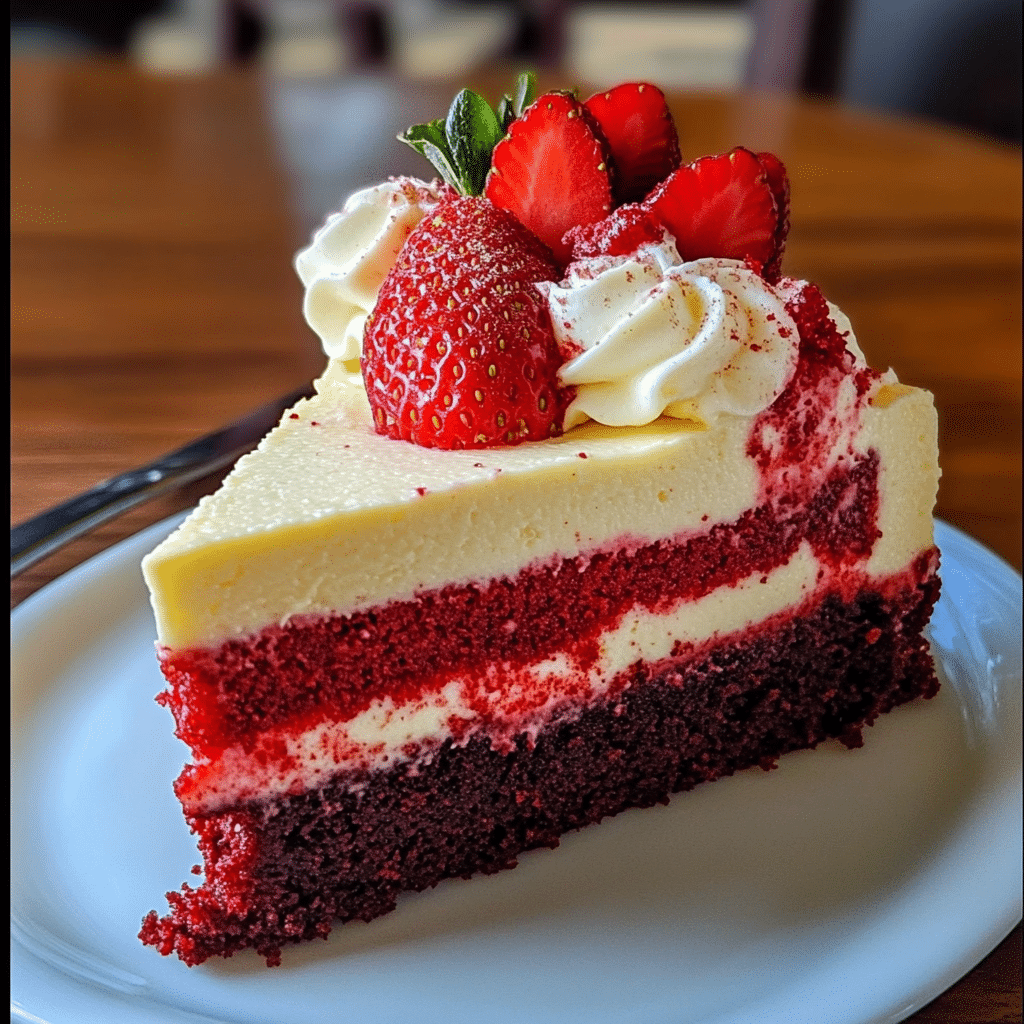
There’s something magical about combining two beloved desserts—red velvet cake and cheesecake—and when you throw in the freshness of strawberries, you’ve got something truly special. The rich, creamy texture of the cheesecake paired with the light cocoa flavor of red velvet is a match made in heaven. And the best part? The burst of sweet, juicy strawberries on top that just take this dessert to the next level.
I first made this strawberry red velvet cheesecake when I was looking for a showstopper dessert for a family gathering. It was one of those moments when I knew I needed something not just tasty but also gorgeous—something that would make everyone’s eyes light up when it hit the table. Let me tell you, this cheesecake delivered on every front! It was the star of the night, and since then, it’s become a favorite in our family for any special occasion, from birthdays to holiday dinners.
If you’re looking for a dessert that’s a little extra (in the best way possible) but still totally doable, this strawberry red velvet cheesecake is for you. It’s perfect for any celebration, and it’s sure to leave everyone asking for seconds. Plus, it’s one of those recipes that seems like it might be difficult, but trust me, you’ve got this! With a little patience and the right ingredients, you’ll be serving up the most decadent cheesecake ever.
Why You’ll Love This Strawberry Red Velvet Cheesecake
This strawberry red velvet cheesecake is so much more than just a dessert—it’s an experience. Here’s why you’re going to fall in love with it:
- A Perfectly Balanced Flavor: The deep, slightly tangy taste of the cheesecake is perfectly balanced with the subtle cocoa flavor of the red velvet. The fresh strawberries add a natural sweetness that brightens up every bite. It’s the ultimate combination of flavors and textures.
- Impressive, Yet Easy to Make: While this dessert looks like something you’d order at a high-end bakery, it’s actually really simple to make. The layers are built up in a few easy steps, and once it’s in the oven, you can sit back and relax.
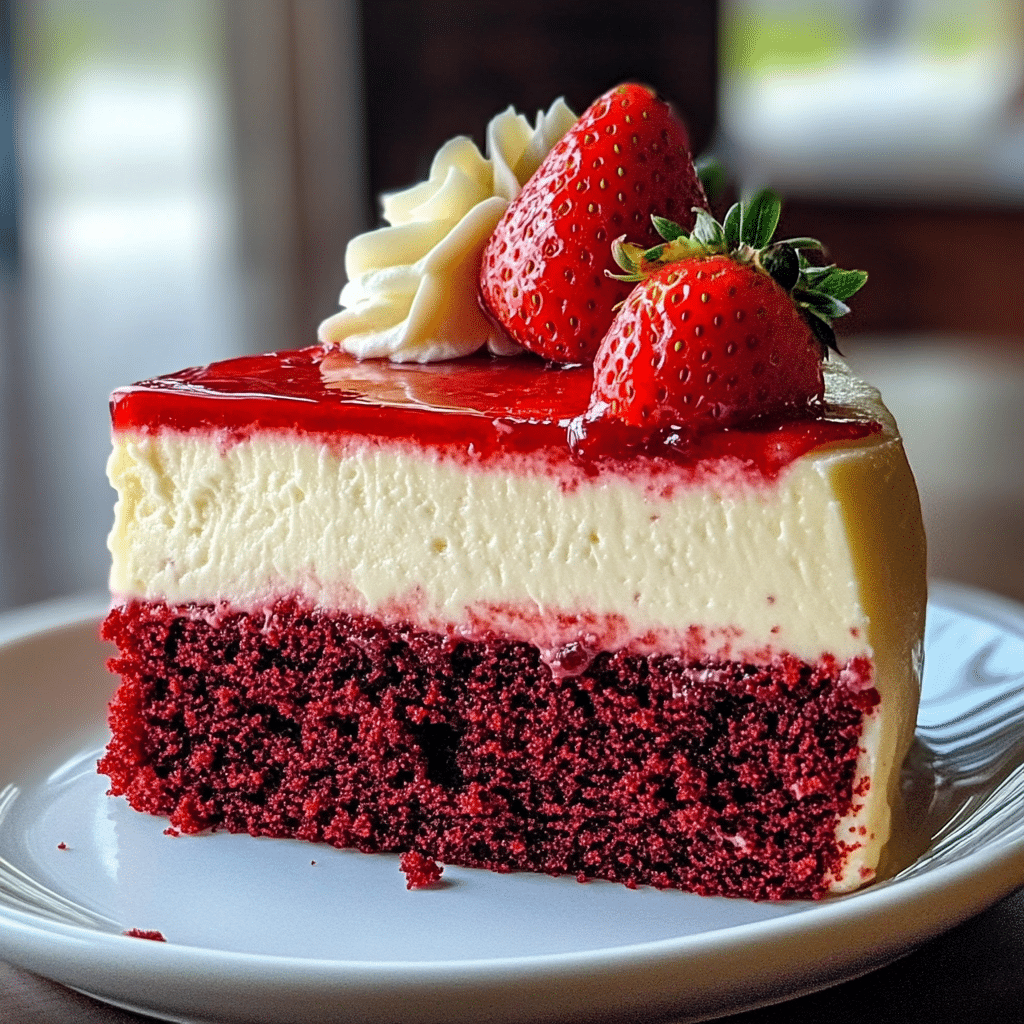
- A Showstopper: Not only does it taste incredible, but it also looks stunning. The rich red velvet and white cheesecake layers, topped with glistening fresh strawberries, create a dessert that’s as beautiful as it is delicious. Trust me, it will wow your guests!
Preparation Time and Servings
- Total Time: 6 hours (includes chilling time)
- Prep Time: 30 minutes
- Cook Time: 1 hour
- Servings: Makes 12-14 servings
Nutrition Facts (per serving):
- Calories: 350
- Protein: 6g
- Carbs: 40g
- Fat: 20g
- Fiber: 1g
- Sugar: 28g
Ingredients
Here’s what you’ll need to make this showstopper of a dessert:
Red Velvet Cake Layer:
- 1 ½ cups all-purpose flour
- 1 cup granulated sugar
- 1 tablespoon cocoa powder
- 1 teaspoon baking powder
- ½ teaspoon baking soda
- ½ teaspoon salt
- 2 large eggs
- ½ cup vegetable oil
- 1 teaspoon vanilla extract
- 1 tablespoon red food coloring (use gel for a more vibrant color)
- ½ cup buttermilk
- ½ teaspoon white vinegar
Cheesecake Layer:
- 3 (8 oz) packages cream cheese, softened
- 1 cup granulated sugar
- 1 teaspoon vanilla extract
- 3 large eggs
- ½ cup sour cream
- ¼ cup heavy cream
Strawberry Topping:
- 1 ½ cups fresh strawberries, hulled and sliced
- 2 tablespoons granulated sugar
- 1 teaspoon lemon juice
Optional Garnish:
- Whipped cream
- Fresh mint leaves
Step-by-Step Instructions
This strawberry red velvet cheesecake may look fancy, but the process is pretty straightforward! Follow these easy steps, and you’ll have a dessert that will impress everyone.
1st Step: Prepare the Red Velvet Cake Layer
- Preheat your oven to 350°F (175°C) and grease a 9-inch springform pan. Line the bottom with parchment paper for easy removal.
- In a large bowl, sift together the flour, cocoa powder, baking powder, baking soda, and salt. Set it aside.
- In a separate bowl, whisk together the eggs, sugar, oil, and vanilla extract until smooth.
- Add the red food coloring to the wet mixture and stir until well combined. The color will be vibrant!
- Gradually add the flour mixture to the wet ingredients, alternating with the buttermilk. Start and end with the flour mixture. Mix just until combined—don’t overmix.
- Stir in the white vinegar, which will help activate the baking soda and give the cake a light, fluffy texture.
- Pour the batter into the prepared springform pan and smooth the top with a spatula. Bake for about 25-30 minutes, or until a toothpick inserted into the center comes out clean. Set the cake aside to cool completely.
2nd Step: Prepare the Cheesecake Layer
- In a large mixing bowl, beat the softened cream cheese with a hand mixer or stand mixer until smooth and creamy, about 2-3 minutes.
- Add the sugar and vanilla extract, and continue beating until well combined.
- Add the eggs, one at a time, mixing on low speed after each addition.
- Mix in the sour cream and heavy cream until the batter is smooth and silky.
- Pour the cheesecake mixture over the cooled red velvet cake layer in the springform pan. Use a spatula to spread it evenly.
3rd Step: Bake the Cheesecake
- Place the springform pan on a baking sheet to catch any drips, and bake in the preheated oven at 325°F (163°C) for 50-60 minutes. The cheesecake should be set around the edges but slightly jiggly in the center.
- Once done, turn off the oven, crack the oven door, and let the cheesecake cool in the oven for 1 hour. This helps prevent cracks.
- After the hour, transfer the cheesecake to a wire rack and let it cool completely before chilling in the fridge for at least 4 hours (overnight is best).
4th Step: Prepare the Strawberry Topping
- While the cheesecake is chilling, prepare the strawberry topping. In a small bowl, combine the sliced strawberries, sugar, and lemon juice. Stir gently to coat the strawberries in the sugar and juice.
- Let the mixture sit for 30 minutes to allow the strawberries to release their juices and become even more flavorful.
5th Step: Assemble the Cheesecake
- Once the cheesecake has chilled and set, remove it from the springform pan. Place it on a serving platter.
- Spoon the strawberry topping generously over the cheesecake, allowing some of the juice to drizzle down the sides for extra flavor.
- Garnish with whipped cream and fresh mint leaves if desired for a beautiful finish.
How to Serve
- Serve your strawberry red velvet cheesecake as is, or with a dollop of fresh whipped cream for an extra indulgent touch.
- For a complete dessert spread, serve with a side of fresh fruit or a scoop of vanilla ice cream.
- Pair with a hot cup of coffee or a glass of milk to balance the sweetness.
Additional Tips for Success
- Chill it Well: Make sure to allow plenty of time for the cheesecake to chill. The flavors will meld beautifully, and the texture will firm up to perfection.
- Use Room Temperature Ingredients: Make sure your cream cheese and eggs are at room temperature to avoid lumps in your cheesecake batter.
- Don’t Overbake: A slightly jiggly center is okay! The cheesecake will set as it cools.
- Keep It Smooth: When mixing the cheesecake batter, be sure to scrape down the sides of the bowl to ensure everything is well combined and smooth.
- Store Properly: Leftovers should be stored in an airtight container in the fridge for up to 3 days. Just be sure to cover the strawberry topping to prevent it from getting soggy.
Recipe Variations
- For a Nutty Twist: Add crushed pecans or walnuts to the crust for an extra crunchy bite.
- For a Chocolate Lover’s Dream: Add a layer of chocolate ganache on top of the cheesecake layer before adding the strawberries for a richer flavor.
- Gluten-Free Option: Use gluten-free all-purpose flour and gluten-free crumbs for the red velvet cake layer.
Serving Suggestions
- Side Dishes: Serve with roasted nuts or a light salad with a citrus vinaigrette for a refreshing contrast to the rich cheesecake.
- For Kids: Serve in individual portions in cute jars for a fun presentation that kids will love.
- Pair with Wine: A sparkling rosé or a light dessert wine would complement the strawberry topping beautifully.
Freezing and Storage
- Storing Leftovers: Keep your cheesecake stored in the fridge for up to 3 days. Make sure to cover the top with plastic wrap or a lid.
- Freezing: If you want to make this dessert ahead of time, freeze the cheesecake (without the strawberry topping) for up to 1 month. Just let it thaw in the fridge overnight before serving, and then add the strawberries on top.
Special Equipment
- Springform Pan: A 9-inch springform pan is essential for this recipe to allow easy removal of the cheesecake.
- Mixer: Use either a hand mixer or stand mixer to achieve a smooth, creamy cheesecake filling.
- Baking Sheet: Place your cheesecake on a baking sheet to catch any potential drips while it’s baking.
FAQ
Can I make this cheesecake ahead of time?
Yes, this cheesecake is great for make-ahead! Prepare it the day before, chill it overnight, and then add the strawberry topping right before serving.
Can I use frozen strawberries for the topping?
Fresh strawberries are preferred for the topping, but you can use frozen if fresh ones aren’t available. Just make sure to thaw them and drain any excess water before using them.
Can I use a different type of food coloring?
You can use gel food coloring to get a deeper, richer color, but liquid food coloring will work just fine too. Just be sure to adjust the amount to achieve your desired red hue.
Strawberry Red Velvet Cheesecake
- Total Time: 6 hours
Ingredients
For the Red Velvet Cake Layer:
- 1 ½ cups all-purpose flour
- 1 cup granulated sugar
- 1 tablespoon cocoa powder
- 1 teaspoon baking powder
- ½ teaspoon baking soda
- ½ teaspoon salt
- 2 large eggs
- ½ cup vegetable oil
- 1 teaspoon vanilla extract
- 1 tablespoon red food coloring (use gel for a more vibrant color)
- ½ cup buttermilk
- ½ teaspoon white vinegar
For the Cheesecake Layer:
- 3 (8 oz) packages cream cheese, softened
- 1 cup granulated sugar
- 1 teaspoon vanilla extract
- 3 large eggs
- ½ cup sour cream
- ¼ cup heavy cream
For the Strawberry Topping:
- 1 ½ cups fresh strawberries, hulled and sliced
- 2 tablespoons granulated sugar
- 1 teaspoon lemon juice
Optional Garnish:
- Whipped cream
- Fresh mint leaves
Instructions
Step 1: Prepare the Red Velvet Cake Layer
- Preheat your oven to 350°F (175°C) and grease a 9-inch springform pan. Line the bottom with parchment paper for easy removal.
- In a large bowl, sift together the flour, cocoa powder, baking powder, baking soda, and salt. Set it aside.
- In a separate bowl, whisk together the eggs, sugar, oil, and vanilla extract until smooth.
- Add the red food coloring to the wet mixture and stir until well combined. The color will be vibrant!
- Gradually add the flour mixture to the wet ingredients, alternating with the buttermilk. Start and end with the flour mixture. Mix just until combined—don’t overmix.
- Stir in the white vinegar, which will help activate the baking soda and give the cake a light, fluffy texture.
- Pour the batter into the prepared springform pan and smooth the top with a spatula. Bake for about 25-30 minutes, or until a toothpick inserted into the center comes out clean. Set the cake aside to cool completely.
Step 2: Prepare the Cheesecake Layer
- In a large mixing bowl, beat the softened cream cheese with a hand mixer or stand mixer until smooth and creamy, about 2-3 minutes.
- Add the sugar and vanilla extract, and continue beating until well combined.
- Add the eggs, one at a time, mixing on low speed after each addition.
- Mix in the sour cream and heavy cream until the batter is smooth and silky.
- Pour the cheesecake mixture over the cooled red velvet cake layer in the springform pan. Use a spatula to spread it evenly.
Step 3: Bake the Cheesecake
- Place the springform pan on a baking sheet to catch any drips, and bake in the preheated oven at 325°F (163°C) for 50-60 minutes. The cheesecake should be set around the edges but slightly jiggly in the center.
- Once done, turn off the oven, crack the oven door, and let the cheesecake cool in the oven for 1 hour. This helps prevent cracks.
- After the hour, transfer the cheesecake to a wire rack and let it cool completely before chilling in the fridge for at least 4 hours (overnight is best).
Step 4: Prepare the Strawberry Topping
- While the cheesecake is chilling, prepare the strawberry topping. In a small bowl, combine the sliced strawberries, sugar, and lemon juice. Stir gently to coat the strawberries in the sugar and juice.
- Let the mixture sit for 30 minutes to allow the strawberries to release their juices and become even more flavorful.
Step 5: Assemble the Cheesecake
- Once the cheesecake has chilled and set, remove it from the springform pan. Place it on a serving platter.
- Spoon the strawberry topping generously over the cheesecake, allowing some of the juice to drizzle down the sides for extra flavor.
- Garnish with whipped cream and fresh mint leaves if desired for a beautiful finish.
- Prep Time: 30 minutes
- Cook Time: 1 hour
Nutrition
- Serving Size: 14
- Calories: 350
- Sugar: 28g
- Fat: 20g
- Carbohydrates: 40g
- Fiber: 1g
- Protein: 6g
Conclusion
This strawberry red velvet cheesecake is a showstopper that’s sure to impress everyone who tries it. With its rich layers, creamy cheesecake filling, and bright strawberry topping, it’s the perfect dessert for any special occasion. I can’t wait for you to try it! Don’t forget to share your creations with me on Instagram—I love seeing how you bring this beautiful dessert to life!

