Introduction
There’s something truly magical about Halloween—it’s that time of year when we can indulge in our love for all things spooky and sweet. Every October, my family and I dive headfirst into the Halloween spirit with all kinds of fun treats. One of our absolute favorites is Spooky Mummy Brownies! These delightful desserts are not just delicious but also super fun to make together, especially with the little ones.
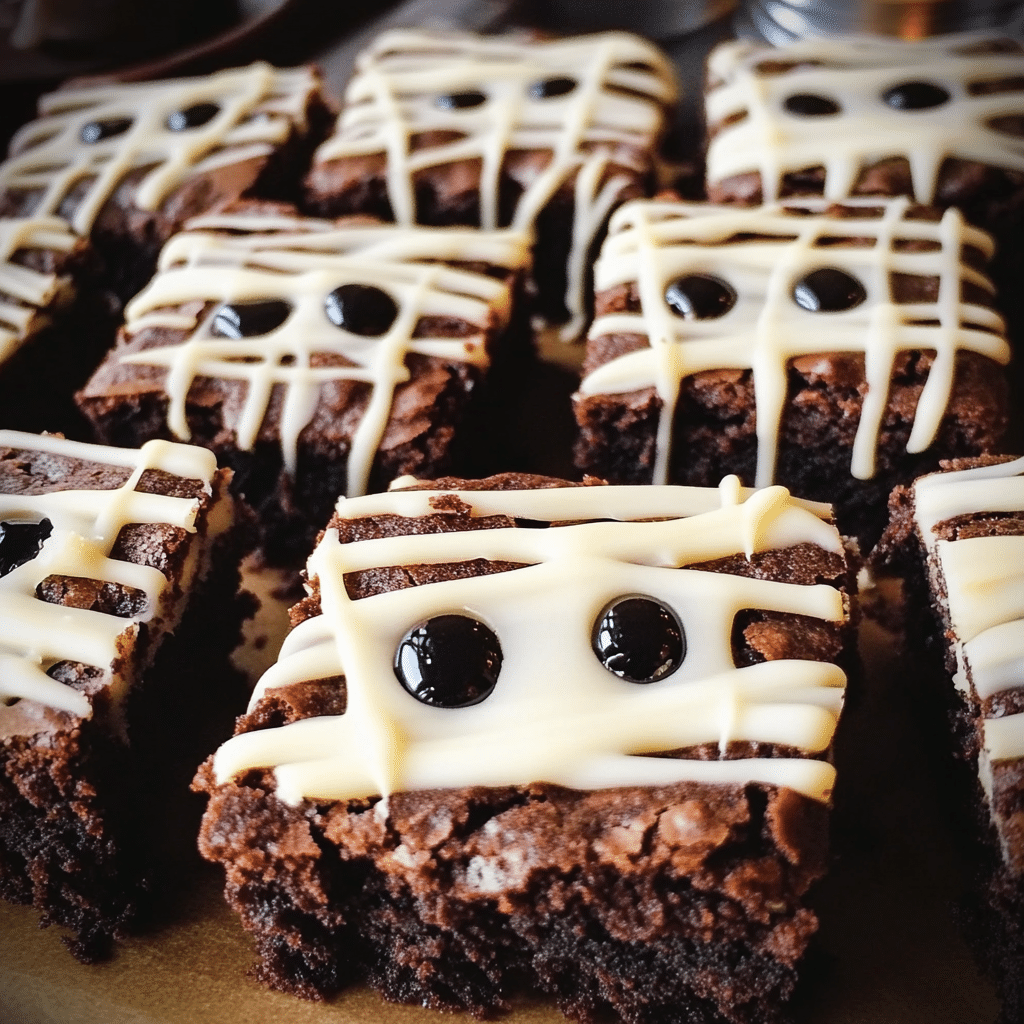
I remember the first time I made these brownies. My daughter was just old enough to help in the kitchen, and she was so excited to get her hands sticky with chocolate. As we drizzled the white chocolate “bandages” over the brownies, we giggled about how they looked like little mummies coming to life. They’ve since become a staple at our Halloween parties, delighting both kids and adults alike with their rich chocolate flavor and adorable appearance.
So, if you’re ready to whip up a batch of these hauntingly delicious treats, let’s dive into this recipe! Trust me, you’ll want to add these to your Halloween lineup.
Why You’ll Love This Recipe
- Easy to Make: These brownies come together quickly, making them perfect for last-minute Halloween treats or a fun baking session with the kids.
- Chocolatey Goodness: Rich, fudgy brownies topped with creamy white chocolate make for a heavenly combination.
- Kid-Friendly: The decorating process is a blast, and kids love getting involved in the spooky fun.
- Customizable: You can easily adapt the decorations to create different spooky faces or use other candies for eyes!
Preparation Time and Servings
- Total Time: 1 hour
- Preparation Time: 20 minutes
- Cooking Time: 30 minutes
- Cooling Time: 10 minutes
- Servings: This recipe makes about 12 brownies, depending on how you cut them.
Nutrition Facts
- Calories per serving: Approximately 250
- Protein: 3g
- Carbs: 35g
- Fat: 12g
Ingredients
Here’s what you’ll need to whip up a batch of these spooky delights:
- For the Brownies:
- 1 cup (2 sticks) unsalted butter, melted
- 2 cups granulated sugar
- 4 large eggs
- 1 teaspoon vanilla extract
- 1 cup all-purpose flour
- 1 cup unsweetened cocoa powder
- 1/2 teaspoon salt
- 1 teaspoon baking powder
- For the Topping:
- 1 cup white chocolate chips (or melting chocolate)
- Candy eyeballs (found at most craft or baking stores)
These simple ingredients come together to create a rich brownie base that is absolutely irresistible! The white chocolate drizzle adds that spooky mummy touch while keeping things deliciously sweet.
Step-by-Step Instructions
Making these Spooky Mummy Brownies is easier than you might think! Here’s how to do it:
Step 1: Preheat Your Oven
Preheat your oven to 350°F (175°C). This ensures that your brownies will bake evenly.
Step 2: Prepare the Baking Dish
Grease a 9×13-inch baking pan or line it with parchment paper for easy removal. If using parchment paper, leave some overhang so you can lift the brownies out later.
Step 3: Make the Brownie Batter
In a large mixing bowl, combine the melted butter and granulated sugar. Mix well until the sugar is fully incorporated and the mixture looks smooth.
- Tip: If you want a fudgier texture, use brown sugar instead of granulated sugar for part of the mixture.
Add the eggs one at a time, mixing well after each addition. Stir in the vanilla extract.
In a separate bowl, whisk together the flour, cocoa powder, salt, and baking powder. Gradually add the dry ingredients to the wet mixture, stirring until just combined. Be careful not to overmix, as this can lead to dense brownies.
Step 4: Bake the Brownies
Pour the brownie batter into the prepared baking pan and spread it evenly. Bake in the preheated oven for about 30 minutes or until a toothpick inserted into the center comes out with a few moist crumbs.
- Pro Tip: If you like your brownies extra fudgy, check them a couple of minutes early!
Once done, remove from the oven and allow the brownies to cool in the pan for about 10 minutes before transferring them to a wire rack to cool completely.
Step 5: Melt the White Chocolate
While your brownies are cooling, melt the white chocolate chips. You can do this using a microwave-safe bowl, heating them in 30-second intervals and stirring until smooth.
- Tip: You can also use a double boiler if you prefer a gentler melting method. Just be sure not to let any water get into the chocolate!
Step 6: Decorate Your Mummies
Once the brownies are completely cooled, cut them into squares or rectangles. Drizzle the melted white chocolate over the brownies in a zigzag pattern to create the mummy bandages.
- Fun Fact: You can use a piping bag or a plastic sandwich bag with the corner snipped off for more control when decorating.
Place two candy eyeballs on each brownie while the white chocolate is still warm.
- Tip: Feel free to adjust the positioning of the eyes to give your mummies different expressions!
How to Serve
These brownies are not just delicious; they also make a fantastic centerpiece for your Halloween party. Here are some fun serving suggestions:
- On a spooky platter: Arrange the mummies on a Halloween-themed serving dish with some fake spiders for an extra creepy touch.
- With a side of ice cream: Serve warm brownies with a scoop of vanilla or pumpkin ice cream for a delightful contrast of flavors.
- As party favors: Wrap individual brownies in clear bags and tie them with orange or black ribbons to give as treats to your guests.
Additional Tips
Here are five tips to help ensure your Spooky Mummy Brownies turn out perfectly:
- Don’t Overbake: Check the brownies a couple of minutes before the recommended baking time to ensure they stay moist and fudgy.
- Use Quality Chocolate: For the best flavor, use good-quality white chocolate. It makes a noticeable difference in taste!
- Experiment with Flavors: Feel free to mix in some chocolate chips or nuts into the brownie batter for added texture.
- Get Creative with Decor: Instead of traditional candy eyeballs, you could use mini chocolate chips or M&Ms for the eyes.
- Make Ahead: You can bake the brownies a day in advance and decorate them the next day. Just store them in an airtight container.
Recipe Variations
Want to switch things up? Here are a few variations you might enjoy:
- Mint Mummies: Add a few drops of mint extract to the brownie batter for a refreshing twist.
- Spicy Mummies: Mix in a pinch of cinnamon or chili powder for a fun kick!
- Pumpkin Brownies: Substitute half of the butter with pumpkin puree for a seasonal twist.
- Gluten-Free Option: Swap out the all-purpose flour for a gluten-free blend to accommodate dietary restrictions.
Serving Suggestions
Pair your Spooky Mummy Brownies with some delicious sides or drinks:
- Halloween-themed drinks: Serve with orange soda or a spooky punch for a festive touch.
- Side Dishes: Offer some Halloween snacks like popcorn balls or caramel apples.
- Kids’ Favorites: For a family-friendly gathering, consider serving with milk or hot chocolate for dipping!
Freezing and Storage
If you have any leftovers (which is rare but possible!), here’s how to store them:
- Storage: Keep the brownies in an airtight container at room temperature for up to 3 days.
- Freezing: For longer storage, you can freeze the brownies. Wrap them individually in plastic wrap, then place them in a freezer-safe bag or container. They’ll last up to 3 months!
- Reheating: To enjoy, simply thaw at room temperature or pop them in the microwave for a few seconds for that fresh-baked taste.
Special Equipment
While you don’t need much to whip up these brownies, a few items can make the process easier:
- Baking Pan: A good-quality 9×13-inch pan is essential for even baking.
- Parchment Paper: Great for easy cleanup and helps the brownies come out perfectly.
- Microwave-Safe Bowl: For melting the chocolate quickly and conveniently.
- Piping Bag: Helpful for drizzling the white chocolate, but not mandatory.
FAQ Section
1. Can I use milk chocolate instead of white chocolate?
Yes! While it won’t give you the classic mummy look, milk chocolate will still be delicious. Just adjust the sweetness if needed.
2. How can I make these brownies more chocolatey?
You can add chocolate chips to the brownie batter for extra chocolate goodness.
3. What if I don’t have candy eyeballs?
No worries! You can use mini chocolate chips, M&Ms, or even a dab of frosting for eyes.
4. Can I decorate these brownies ahead of time?
Absolutely! Just store the decorated brownies in an airtight container, but keep in mind that the white chocolate may soften over time.
5. How do I cut brownies neatly?
To get clean cuts, use a sharp knife and wipe it with
Spooky Mummy Brownies
- Total Time: 40 minutes
Ingredients
Here’s what you’ll need to whip up a batch of these spooky delights:
- For the Brownies:
- 1 cup (2 sticks) unsalted butter, melted
- 2 cups granulated sugar
- 4 large eggs
- 1 teaspoon vanilla extract
- 1 cup all-purpose flour
- 1 cup unsweetened cocoa powder
- 1/2 teaspoon salt
- 1 teaspoon baking powder
- For the Topping:
- 1 cup white chocolate chips (or melting chocolate)
- Candy eyeballs (found at most craft or baking stores)
Instructions
Making these Spooky Mummy Brownies is easier than you might think! Here’s how to do it:
Step 1: Preheat Your Oven
Preheat your oven to 350°F (175°C). This ensures that your brownies will bake evenly.
Step 2: Prepare the Baking Dish
Grease a 9×13-inch baking pan or line it with parchment paper for easy removal. If using parchment paper, leave some overhang so you can lift the brownies out later.
Step 3: Make the Brownie Batter
In a large mixing bowl, combine the melted butter and granulated sugar. Mix well until the sugar is fully incorporated and the mixture looks smooth.
- Tip: If you want a fudgier texture, use brown sugar instead of granulated sugar for part of the mixture.
Add the eggs one at a time, mixing well after each addition. Stir in the vanilla extract.
In a separate bowl, whisk together the flour, cocoa powder, salt, and baking powder. Gradually add the dry ingredients to the wet mixture, stirring until just combined. Be careful not to overmix, as this can lead to dense brownies.
Step 4: Bake the Brownies
Pour the brownie batter into the prepared baking pan and spread it evenly. Bake in the preheated oven for about 30 minutes or until a toothpick inserted into the center comes out with a few moist crumbs.
- Pro Tip: If you like your brownies extra fudgy, check them a couple of minutes early!
Once done, remove from the oven and allow the brownies to cool in the pan for about 10 minutes before transferring them to a wire rack to cool completely.
Step 5: Melt the White Chocolate
While your brownies are cooling, melt the white chocolate chips. You can do this using a microwave-safe bowl, heating them in 30-second intervals and stirring until smooth.
- Tip: You can also use a double boiler if you prefer a gentler melting method. Just be sure not to let any water get into the chocolate!
Step 6: Decorate Your Mummies
Once the brownies are completely cooled, cut them into squares or rectangles. Drizzle the melted white chocolate over the brownies in a zigzag pattern to create the mummy bandages.
- Fun Fact: You can use a piping bag or a plastic sandwich bag with the corner snipped off for more control when decorating.
Place two candy eyeballs on each brownie while the white chocolate is still warm.
- Tip: Feel free to adjust the positioning of the eyes to give your mummies different expressions!
- Prep Time: 20 minutes
- Cook Time: 30 minutes
Nutrition
- Serving Size: 12
- Calories: 250
- Fat: 12g
- Carbohydrates: 35g
- Protein: 3g
Conclusion
As Halloween approaches, there’s no better way to embrace the festive spirit than by baking a batch of Spooky Mummy Brownies. Not only do they bring a delightful mix of chocolatey goodness and creativity to your kitchen, but they also create cherished memories with family and friends as you decorate and enjoy these treats together.
Whether you’re hosting a Halloween party, looking for a fun dessert to share with your child’s class, or simply wanting to indulge in a sweet treat while watching your favorite spooky movie, these brownies are sure to impress. Their fudgy texture and the fun mummy design will delight both kids and adults, making them a hit at any gathering.
So grab your apron, gather the little ghouls and goblins, and get ready for some delicious Halloween fun. With just a few simple ingredients and a sprinkle of creativity, you can transform ordinary brownies into an extraordinary Halloween masterpiece. Enjoy baking and sharing these Spooky Mummy Brownies, and let the Halloween festivities begin!

