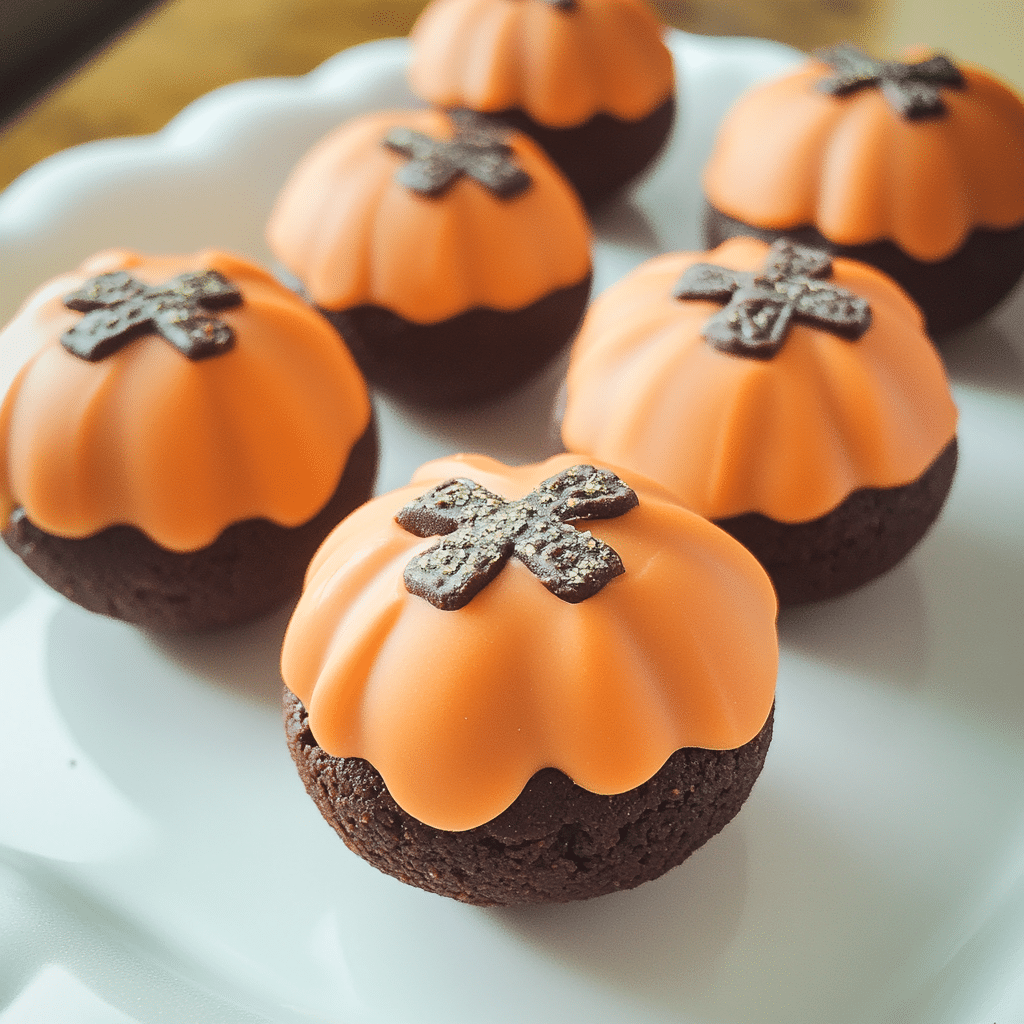
There’s something about fall that makes everything a little more magical. The crisp air, the golden leaves, and of course, pumpkin-flavored everything. It’s that time of year when cozying up with a blanket and indulging in a sweet treat feels just right. And what better way to embrace the season than with these incredibly easy and delicious Pumpkin Oreo Balls? They’re a no-bake dessert that’s perfect for autumn, combining two beloved flavors—pumpkin and Oreo—into one irresistible bite.
If you’ve never made Oreo balls before, let me tell you, they’re a breeze. No baking required, just some mixing, rolling, and dipping. And when you add pumpkin to the mix? It’s next-level fall deliciousness. These Pumpkin Oreo Balls are great for everything from Halloween parties to Thanksgiving dessert tables, or even just as a sweet treat to enjoy with your family on a lazy weekend. Plus, they’re fun to make, so get your kids or friends involved, and you’ve got an activity everyone will love.
I first made these Pumpkin Oreo Balls a few years ago when I was craving something sweet but didn’t want to spend hours in the kitchen. I had some leftover pumpkin puree from another recipe and a pack of Oreos, and thought, “Why not?” The result was better than I could have imagined—rich, creamy, and perfectly pumpkin-y, with that signature Oreo crunch. They quickly became a fall favorite in our house, and now I make them every year!
Why You’ll Love This Recipe
- Easy to Make: With no baking involved, these Pumpkin Oreo Balls come together in just a few simple steps. All you need is a handful of ingredients, and you’ll have a dessert that looks and tastes like you spent way more time on it than you did.
- Family-Friendly: This recipe is perfect for involving the kids. They’ll love crushing the Oreos, mixing everything together, and rolling the mixture into balls. Plus, they’re bite-sized, so they’re easy to grab and eat—perfect for little hands!
- Rich, Creamy Flavor: The combination of creamy pumpkin puree, crushed Oreos, and cream cheese creates a soft, melt-in-your-mouth filling that’s just sweet enough. And when you dip them in chocolate? It’s a flavor explosion!
- Great for Fall Gatherings: These Pumpkin Oreo Balls are a great addition to any fall gathering, whether it’s a Halloween party, a cozy dinner with friends, or a Thanksgiving dessert spread. They’re fun, festive, and always a hit.
- Customizable: You can get creative with the decorations—think orange-colored chocolate, festive sprinkles, or a drizzle of white chocolate. These little bites are as fun to make as they are to eat!
Preparation Time and Servings
- Prep Time: 20 minutes
- Chill Time: 1 hour (for firming up)
- Total Time: 1 hour 20 minutes
- Servings: Makes about 24 balls
- Nutrition per serving (approximate): 150 calories, 10g fat, 18g carbs, 1g protein
Ingredients
- 1 pack (14.3 oz) Oreo cookies, crushed (you can use Pumpkin Spice Oreos for extra pumpkin flavor or stick with classic Oreos)
- 1/2 cup canned pumpkin puree (make sure it’s puree, not pumpkin pie filling)
- 8 oz cream cheese, softened
- 1 tsp pumpkin pie spice
- 1/2 tsp cinnamon
- 1/2 tsp vanilla extract
- 12 oz white chocolate or milk chocolate, melted (for dipping)
- Festive sprinkles or orange-tinted white chocolate for decoration (optional)
Ingredient Breakdown:
- Oreo Cookies: The base of the recipe. Crushing these creates the signature cookie and cream flavor that’s both rich and sweet. Pumpkin Spice Oreos can add an extra layer of fall flavor.
- Pumpkin Puree: Adds moisture and that unmistakable pumpkin flavor. Be sure to use pure pumpkin puree, not pumpkin pie filling, as the latter contains additional sweeteners and spices.
- Cream Cheese: This brings a creamy, tangy richness to the balls, balancing out the sweetness of the Oreos and pumpkin.
- Pumpkin Pie Spice and Cinnamon: These spices enhance the pumpkin flavor and bring that cozy, fall essence to the dessert.
- Vanilla Extract: A small amount of vanilla brings out all the other flavors, making everything taste better.
- Chocolate: Whether you choose white chocolate for a creamy, smooth exterior, or milk chocolate for a deeper, richer coating, this step is key to making these balls indulgent. If you want to keep things festive, you can color your white chocolate orange for a fun, seasonal look.
Step-by-Step Instructions
Step 1: Crush the Oreos
- Start by crushing the Oreo cookies. You can do this by placing them in a food processor and pulsing until they form fine crumbs. If you don’t have a food processor, place the cookies in a ziplock bag and crush them with a rolling pin. You’ll want to make sure they’re as finely crushed as possible so they mix well with the other ingredients.
Step 2: Mix the Filling
- In a large mixing bowl, combine the crushed Oreos, pumpkin puree, softened cream cheese, pumpkin pie spice, cinnamon, and vanilla extract. Using a spatula or an electric mixer, mix until everything is well combined and you have a smooth, uniform mixture. The mixture will be a little soft, but don’t worry—it’ll firm up once chilled.
Step 3: Chill the Mixture
- Once everything is mixed together, cover the bowl and refrigerate the mixture for at least 30 minutes, or until it’s firm enough to handle. This step is important because it makes it easier to roll the mixture into balls without it sticking to your hands.
Step 4: Roll into Balls
- After chilling, remove the mixture from the fridge. Using a spoon or a small cookie scoop, scoop out portions of the mixture and roll them into 1-inch balls between your palms. Place the rolled balls onto a baking sheet lined with parchment paper.
Step 5: Chill Again
- Once you’ve rolled all the balls, place the baking sheet in the freezer for about 20-30 minutes. This helps the balls firm up and makes dipping them in chocolate easier.
Step 6: Dip in Chocolate
- While the balls are chilling, melt the white or milk chocolate in a microwave-safe bowl, heating in 30-second intervals and stirring in between until smooth and fully melted. Once the balls are firm, dip each one into the melted chocolate, making sure it’s fully coated. Use a fork to lift them out, letting any excess chocolate drip off before placing them back on the parchment paper.
Step 7: Decorate
- If you want to get fancy, now’s the time to add some fun decorations. You can drizzle melted orange-colored white chocolate over the top for a festive look, or sprinkle on some fall-themed sprinkles before the chocolate sets. If you prefer a simpler look, you can skip this step altogether—the balls will still taste amazing!
Step 8: Let the Chocolate Set
- Allow the chocolate coating to fully set before serving. You can speed up this process by placing the tray in the fridge for about 15 minutes.
How to Serve
Pumpkin Oreo Balls are best served chilled, as the firm texture really brings out the creamy filling and crunchy coating. Here are a few ideas for serving these delightful treats:
- Party Platter: Arrange them on a decorative plate with a mix of Halloween or fall-themed treats for a show-stopping dessert spread.
- With Coffee or Hot Chocolate: These are perfect alongside a warm cup of coffee, pumpkin spice latte, or hot chocolate.
- Edible Gift: Place them in a cute box or jar and gift them to friends, neighbors, or family. They’re the perfect homemade fall gift.
Additional Tips for Perfect Pumpkin Oreo Balls
- Use Room Temperature Cream Cheese: Softened cream cheese blends more smoothly into the mixture, preventing any lumps.
- Chill Before Rolling: Don’t skip the chilling step before rolling the mixture into balls. It makes the process so much easier and less messy.
- Freeze for a Firmer Bite: If you like your Oreo balls a little firmer, try storing them in the freezer instead of the fridge. They’re delicious slightly frozen too!
- Add a Crunchy Element: If you want to add a little texture, mix in some chopped nuts or toffee bits into the filling.
- Color Your Chocolate: For an extra festive touch, you can color white chocolate with food coloring to match the season. Think orange for Halloween or Thanksgiving.
Recipe Variations
- Gluten-Free: Use gluten-free Oreo cookies to make this recipe gluten-friendly. The rest of the ingredients are naturally gluten-free!
- Vegan Version: Substitute the cream cheese with a dairy-free version and use vegan-friendly chocolate for dipping. Oreos are surprisingly vegan, so you’re good to go there!
- Add a Spice Kick: If you like a little spice, mix in a pinch of cayenne or chili powder into the filling for a sweet and spicy combo.
- Chocolate Lover’s Version: Add some mini chocolate chips to the filling for even more chocolatey goodness.
Freezing and Storage
- Storage: These Pumpkin Oreo Balls will keep in an airtight container in the fridge for up to 5 days. Just make sure they’re well covered so they don’t absorb any fridge odors.
- Freezing: To freeze, place the Oreo balls on a baking sheet and freeze until solid. Once frozen, transfer them to a freezer-safe bag or container and store for up to 3 months. Thaw in the fridge before serving.
Special Equipment
- Food Processor: While not necessary, a food processor makes crushing the Oreos quick and easy.
- Microwave or Double Boiler: For melting the chocolate smoothly.
FAQ
- Can I use homemade pumpkin puree?: Yes, just make sure it’s well-drained to avoid adding too much moisture.
- Can I use a different type of cookie?: Absolutely! While Oreos are classic, you can substitute with ginger snaps, graham crackers, or any other cookie you like.
- Can I make these ahead?: Yes! These are great to make a day ahead. Just store them in the fridge until ready to serve.
And there you have it, Pumpkin Oreo Balls! I can’t wait to see how yours turn out. Don’t forget to snap a picture and tag me on social media—I love seeing your delicious creations! Whether you’re enjoying them with friends, family, or just as a little treat for yourself, these no-bake delights are sure to become a fall favorite.
Print
Pumpkin Oreo Balls
- Total Time: 50 minutes
Description
Pumpkin Oreo Balls have become a delightful fall favorite in my house, and let me tell you, they’re a hit every time I make them. Imagine this: rich Oreo goodness wrapped in a spiced pumpkin blanket, dipped in creamy white chocolate—absolute perfection in every bite. My family couldn’t stop grabbing them from the fridge! They’re easy to make, and even easier to devour. The best part? These little treats are no-bake, which means less time in the kitchen and more time enjoying that delicious pumpkin flavor. Trust me, once you try these, they’ll become a staple in your fall dessert lineup.
Ingredients
Here’s what you need to make these indulgent Pumpkin Oreo Balls:
- 1 package of Oreo cookies (regular or golden Oreos work well)
- 1/2 cup pumpkin puree (canned or homemade)
- 1 teaspoon pumpkin pie spice
- 1 (8 oz) package of cream cheese, softened
- 2 cups white chocolate chips (or white candy melts)
- Optional: orange food coloring for festive fall vibes
- Sprinkles, crushed Oreos, or chopped nuts for decorating (optional)
Instructions
- Crush the Oreos: Start by placing the Oreo cookies in a food processor and pulsing until they turn into fine crumbs. No big chunks should remain. If you don’t have a food processor, you can place the Oreos in a resealable plastic bag and crush them with a rolling pin.
- Mix with pumpkin and cream cheese: In a large mixing bowl, combine the crushed Oreos, pumpkin puree, pumpkin pie spice, and softened cream cheese. Use a hand mixer or a sturdy spoon to mix everything together until it forms a sticky dough.
- Shape the balls: Scoop out the dough using a small cookie scoop or spoon (about 1-2 tablespoons per ball). Roll each portion between your hands to form smooth balls. Place the balls onto a baking sheet lined with parchment paper. Freeze the balls for about 20-30 minutes to firm up.
- Melt the chocolate: In a microwave-safe bowl, melt the white chocolate chips in 20-second increments, stirring in between until smooth. If desired, you can add a few drops of orange food coloring to make the coating more festive.
- Coat the Oreo balls: Once the Oreo balls are firm, dip each one into the melted white chocolate using a fork or toothpick. Tap off any excess chocolate, and then place the dipped balls back on the parchment-lined tray.
- Decorate: While the coating is still wet, sprinkle the balls with your favorite toppings—crushed Oreos, fall-colored sprinkles, or chopped nuts work great. Let them set in the fridge until the chocolate hardens, about 10-15 minutes.
- Enjoy: Once set, your Pumpkin Oreo Balls are ready to serve!
- Prep Time: 20 minutes
- Cook Time: 30 minutes
Nutrition
- Serving Size: 24
- Calories: 120

