Introduction
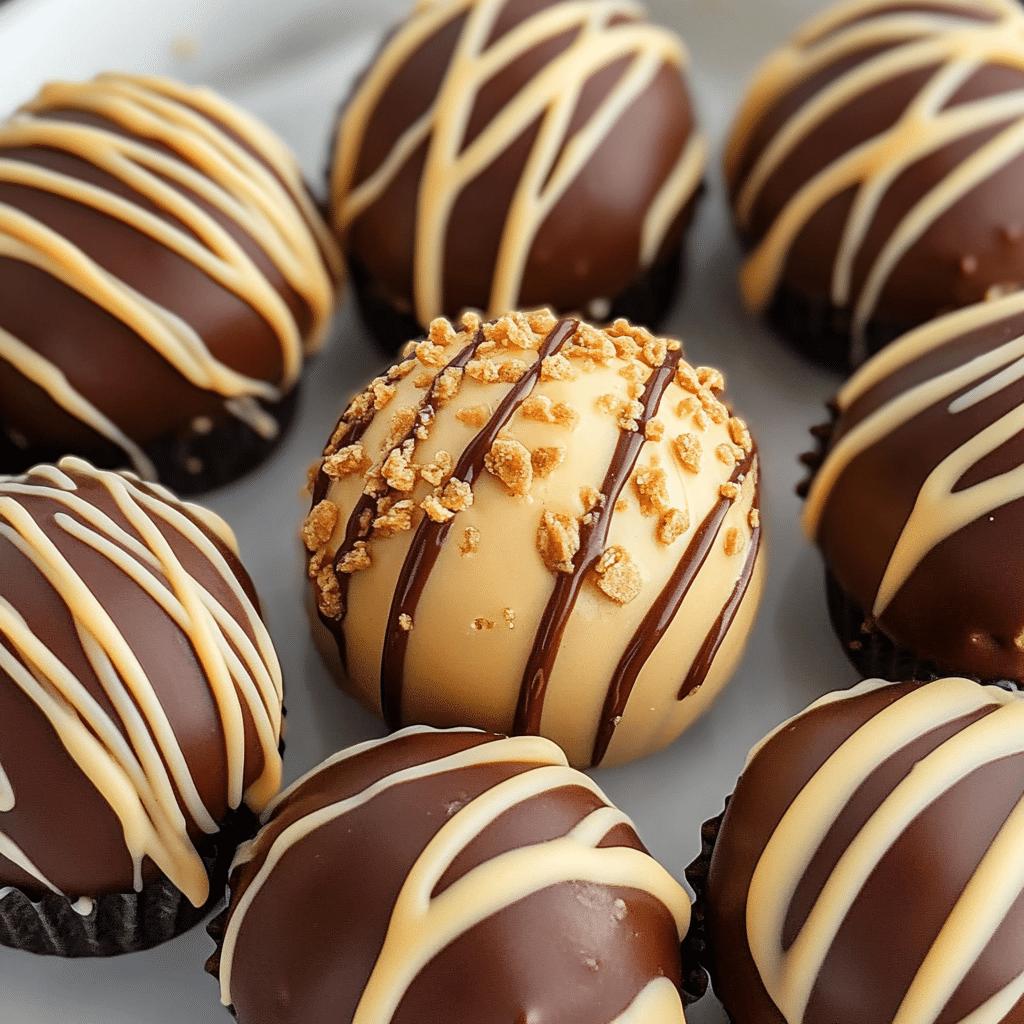
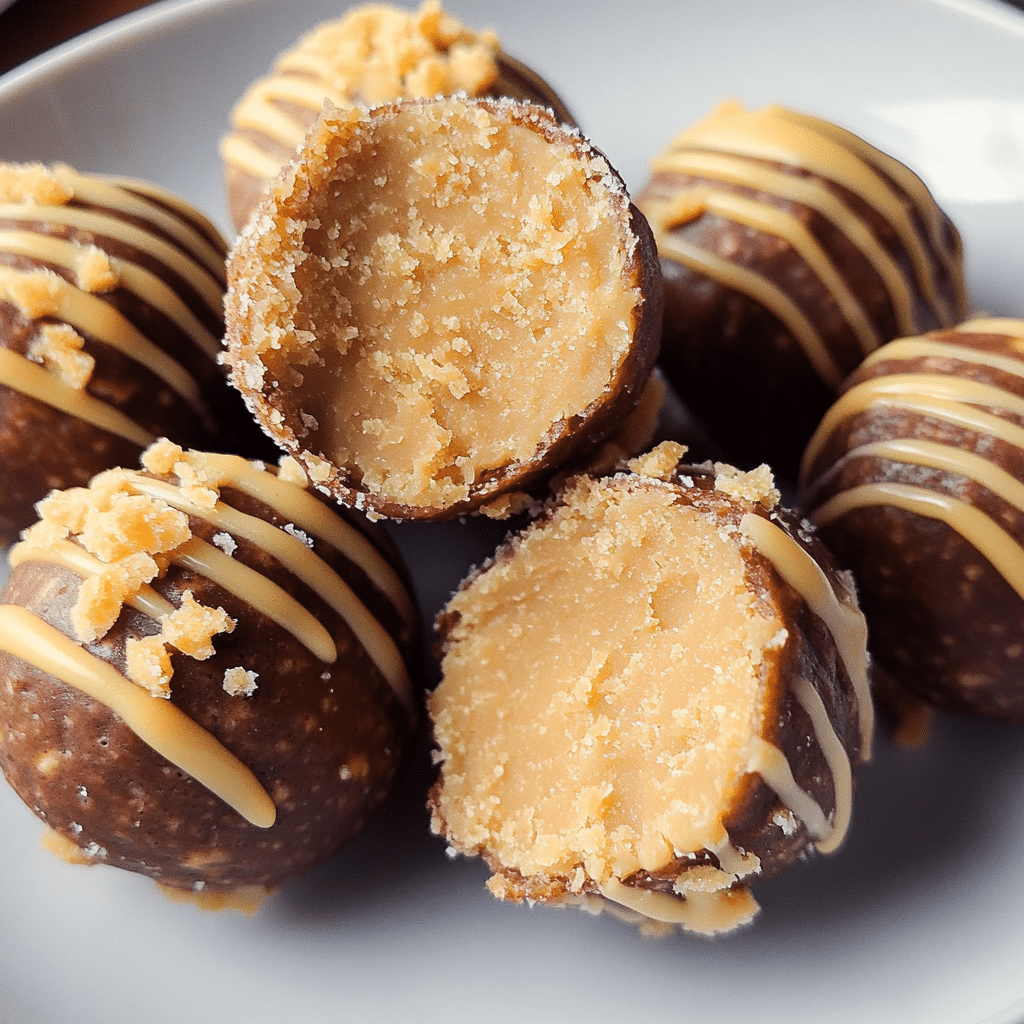
There’s something magical about the combination of creamy peanut butter and chocolate. It’s comforting, indulgent, and downright irresistible. And when you turn that combo into truffles? You’ve got a treat that’ll make you feel like a professional chocolatier without all the complicated steps. These Peanut Butter Truffles are the perfect blend of creamy peanut butter, a touch of sweetness, and a rich chocolate coating that’s sure to satisfy any craving.
I first discovered this recipe one evening when I was craving something sweet but didn’t want to spend hours in the kitchen. I had a jar of peanut butter in the pantry, some chocolate chips in the cupboard, and a few basic ingredients—and that’s when it hit me. I could make peanut butter truffles! They were quick, easy, and incredibly delicious. Plus, they’re no-bake, so you don’t have to worry about heating up the oven.
This recipe has since become a favorite in my household. Every time I make them, they disappear in a flash. The kids love them, the adults love them, and the best part? They’re versatile. You can add toppings like crushed nuts, sprinkles, or sea salt to make them even more fun and customizable. Whether you’re preparing for a party, a holiday treat, or just want something sweet to keep on hand, these Peanut Butter Truffles are a winner every time.
Why You’ll Love This Recipe
Let’s talk about why this Peanut Butter Truffle recipe is a must-try. First and foremost, it’s ridiculously easy to make! If you’re new to the kitchen, don’t worry—this is the perfect recipe for beginners. You don’t need any special equipment, and the prep time is minimal. In fact, you might already have most of the ingredients in your pantry. Plus, they don’t require any baking, which means you can enjoy them in a fraction of the time it would take to make traditional cookies or cakes.
Another reason to love these truffles? They are incredibly rich and satisfying. The smooth peanut butter filling is complemented perfectly by the decadent chocolate coating. When you bite into one, it’s an explosion of creamy peanut butter and sweet, velvety chocolate. It’s the kind of treat that’s both comforting and indulgent, making it perfect for any occasion.
And let’s not forget how fun they are to customize! Whether you want to add crushed pretzels for a salty contrast or a sprinkle of sea salt on top for a bit of gourmet flair, there’s plenty of room for creativity with this recipe. It’s a crowd-pleaser, and it’s one of those simple yet spectacular treats that always makes people smile.
Preparation Time and Servings
- Total Time: 45 minutes (with chilling time)
- Servings: This recipe makes about 20-24 truffles, depending on the size you roll them.
- Nutrition Facts (per serving):
- Calories: 180
- Protein: 5g
- Carbs: 20g
- Fat: 11g
- Sugar: 15g
Ingredients
To make these Peanut Butter Truffles, you’ll need just a few simple ingredients. Here’s what you’ll need:
- 1 cup peanut butter (creamy or crunchy, depending on your preference): The star of the show! The peanut butter gives the truffles their creamy texture and rich flavor.
- 2 cups powdered sugar: This helps to sweeten the peanut butter and give the truffles their firm, dough-like consistency.
- 1 teaspoon vanilla extract: A touch of vanilla helps to round out the flavors and enhance the sweetness of the peanut butter.
- 1/2 cup unsalted butter, softened: Butter adds richness and helps bind the peanut butter mixture together.
- 2 cups chocolate chips (milk, semi-sweet, or dark): The chocolate coating is essential, and it adds a beautiful contrast to the creamy peanut butter center.
- 1-2 tablespoons vegetable oil (for melting chocolate): A little oil helps the chocolate melt smoothly and makes it easier to coat the truffles.
Optional toppings (for a little extra flair):
- Crushed peanuts or pretzels: For a crunchy texture contrast.
- Sprinkles: Fun and festive, especially for holidays.
- Sea salt: A pinch of flaky sea salt on top of the truffles takes the flavor to the next level!
Step-by-Step Instructions
Making these Peanut Butter Truffles is so easy, you might find yourself making them every week. Here’s how you do it:
1st Step: Prepare the Peanut Butter Mixture
- In a large mixing bowl, combine the peanut butter and softened butter. Use a hand mixer or a whisk to blend them together until smooth. If you’re using crunchy peanut butter, it will add a fun texture to the truffles, but creamy peanut butter creates a smooth, velvety finish.
- Add the powdered sugar and vanilla extract to the peanut butter mixture. Mix well until everything is fully incorporated. The mixture will become thick and dough-like. This is normal! You can use a spatula or your hands to knead it together if needed. Don’t worry if it feels a bit sticky—this is the texture you want for the truffles.
2nd Step: Shape the Truffles
- Once the peanut butter mixture is ready, it’s time to roll it into truffles. Take about one tablespoon of the mixture and roll it into a ball between your palms. Keep the truffles about 1 inch in size, but feel free to adjust if you want larger or smaller ones.
- Place the rolled peanut butter balls onto a baking sheet lined with parchment paper or a silicone mat. Continue rolling the rest of the mixture. You should get around 20-24 truffles, depending on the size.
- Once all the truffles are rolled, pop the tray in the fridge for at least 15-20 minutes to firm up the peanut butter mixture. This will make the chocolate coating easier to handle.
3rd Step: Melt the Chocolate
- While the truffles are chilling, it’s time to melt the chocolate. In a microwave-safe bowl, add the chocolate chips and vegetable oil. Heat in 30-second intervals, stirring in between, until the chocolate is completely melted and smooth.
- Alternatively, you can melt the chocolate using a double boiler. Simply place the chocolate and oil in a heatproof bowl over a pot of simmering water, stirring until melted.
4th Step: Coat the Truffles
- Once the peanut butter balls are firm, it’s time to coat them in the melted chocolate. Using a fork or a toothpick, dip each peanut butter ball into the melted chocolate, making sure it’s fully coated. Let the excess chocolate drip off before placing it back onto the parchment-lined tray.
- Repeat this process for each truffle. If you want a little extra texture or flavor, now is the time to add crushed peanuts, pretzels, or a sprinkle of sea salt on top of the chocolate coating.
- Once all the truffles are coated, return the tray to the fridge to let the chocolate set for at least 30 minutes. The chocolate will harden as it cools, leaving you with smooth, chocolate-covered peanut butter bites.
5th Step: Enjoy!
- After the truffles have chilled and the chocolate has set, they’re ready to enjoy! Serve them immediately, or store them in an airtight container in the fridge. These truffles are perfect for snacking, sharing at a party, or gifting to loved ones.
How to Serve
These Peanut Butter Truffles are perfect on their own as a sweet snack, but there are also plenty of ways to serve them up for an extra-special treat. Here are some ideas:
- As a dessert platter: Pair them with other bite-sized treats like mini cupcakes or cookies for a fun, no-bake dessert spread.
- Gift them: Package the truffles in a cute gift box or jar and share them with friends and family during the holidays or at birthdays.
- As an ice cream topping: Chop the truffles into smaller pieces and sprinkle them over vanilla ice cream for a peanut butter-chocolate twist.
Additional Tips
- Use room temperature butter: Softened butter blends more easily with the peanut butter, making it smoother and easier to work with. If you forget to soften your butter, you can microwave it for 10-15 seconds.
- Chill the truffles: Chilling the peanut butter mixture before rolling helps the truffles hold their shape and makes the chocolate coating process much easier.
- Don’t rush the melting process: If using the microwave, be sure to stir the chocolate every 30 seconds to prevent burning. If it’s too thick after melting, add a little more oil to get a smoother coating.
- Customize the topping: Crushed pretzels, toffee bits, or a dash of cinnamon can all make fun additions to the chocolate coating, giving your truffles a unique flavor.
- For smoother coating: If you’re having trouble coating the truffles without making a mess, use a fork to dip the truffles in the chocolate, then tap the fork on the edge of the bowl to remove excess chocolate.
Recipe Variations
Here are a few variations you can try to customize these Peanut Butter Truffles:
- Vegetarian Option: The recipe is already vegetarian-friendly, but if you want to make it dairy-free, use dairy-free chocolate chips and substitute the butter with a vegan alternative like coconut oil.
- Crunchy Peanut Butter: For added texture, use crunchy peanut butter in place of creamy peanut butter.
- Spicy Kick: For a little heat, add a pinch of cayenne pepper or chili powder to the peanut butter mixture. The spicy kick pairs surprisingly well with the sweetness of the chocolate!
- White Chocolate Coating: If you’re not a fan of dark or milk chocolate, try using white chocolate chips for a sweeter, creamier truffle.
Serving Suggestions
These Peanut Butter Truffles go great with a variety of side dishes and beverages:
- Side Dishes: Serve these truffles with a simple fruit platter (think sliced strawberries, bananas, and grapes) for a balanced snack.
- Beverages: They pair wonderfully with a cold glass of milk, coffee, or a hot cup of cocoa for the ultimate sweet experience.
- For kids: Serve these truffles alongside mini sandwiches or fruit skewers for a fun afternoon treat.
Freezing and Storage
If you want to make these Peanut Butter Truffles ahead of time or store leftovers, here’s how to do it:
- Storage: Store leftover truffles in an airtight container in the fridge for up to a week. They’ll stay fresh and keep their texture if properly sealed.
- Freezing: To freeze, place the truffles on a baking sheet and freeze for 1-2 hours. Once frozen, transfer them to a freezer-safe container or bag and store for up to 3 months. When you’re ready to enjoy them, let them thaw in the fridge for a few hours, or at room temperature for 15-20 minutes.
- Reheating: You don’t really need to reheat these truffles—just enjoy them chilled or at room temperature.
Special Equipment
- Baking Sheet with Parchment Paper: This is essential for keeping the truffles from sticking as you chill them.
- Microwave-Safe Bowl: For melting the chocolate smoothly.
- Fork or Toothpick: Helpful for dipping the truffles into the chocolate without making a mess.
FAQ Section
- Can I use store-bought peanut butter?
Yes! Just make sure to use creamy peanut butter that’s not too runny. Natural peanut butter can be a bit too oily, so if you’re using that, be sure to stir it well before adding it to the recipe. - Can I make these truffles ahead of time?
Absolutely! These truffles store well in the fridge for up to a week, and you can also freeze them for up to three months. Just remember to let them thaw before serving. - What if I don’t have chocolate chips?
You can chop up a bar of chocolate if you don’t have chips on hand. Just make sure to chop it into small, even pieces so it melts smoothly. - Can I make these truffles without butter?
Yes! You can substitute the butter with coconut oil for a dairy-free version, or even use almond butter for an added nutty flavor.

Peanut Butter Truffles
- Total Time: 45 minutes
Ingredients
- 1 cup peanut butter (creamy or crunchy, depending on your preference): The star of the show! The peanut butter gives the truffles their creamy texture and rich flavor.
- 2 cups powdered sugar: This helps to sweeten the peanut butter and give the truffles their firm, dough-like consistency.
- 1 teaspoon vanilla extract: A touch of vanilla helps to round out the flavors and enhance the sweetness of the peanut butter.
- 1/2 cup unsalted butter, softened: Butter adds richness and helps bind the peanut butter mixture together.
- 2 cups chocolate chips (milk, semi-sweet, or dark): The chocolate coating is essential, and it adds a beautiful contrast to the creamy peanut butter center.
- 1–2 tablespoons vegetable oil (for melting chocolate): A little oil helps the chocolate melt smoothly and makes it easier to coat the truffles.
Instructions
Step 1: Prepare the Peanut Butter Mixture
- In a large mixing bowl, combine the peanut butter and softened butter. Use a hand mixer or a whisk to blend them together until smooth. If you’re using crunchy peanut butter, it will add a fun texture to the truffles, but creamy peanut butter creates a smooth, velvety finish.
- Add the powdered sugar and vanilla extract to the peanut butter mixture. Mix well until everything is fully incorporated. The mixture will become thick and dough-like. This is normal! You can use a spatula or your hands to knead it together if needed. Don’t worry if it feels a bit sticky—this is the texture you want for the truffles.
Step 2: Shape the Truffles
- Once the peanut butter mixture is ready, it’s time to roll it into truffles. Take about one tablespoon of the mixture and roll it into a ball between your palms. Keep the truffles about 1 inch in size, but feel free to adjust if you want larger or smaller ones.
- Place the rolled peanut butter balls onto a baking sheet lined with parchment paper or a silicone mat. Continue rolling the rest of the mixture. You should get around 20-24 truffles, depending on the size.
- Once all the truffles are rolled, pop the tray in the fridge for at least 15-20 minutes to firm up the peanut butter mixture. This will make the chocolate coating easier to handle.
Step 3: Melt the Chocolate
- While the truffles are chilling, it’s time to melt the chocolate. In a microwave-safe bowl, add the chocolate chips and vegetable oil. Heat in 30-second intervals, stirring in between, until the chocolate is completely melted and smooth.
- Alternatively, you can melt the chocolate using a double boiler. Simply place the chocolate and oil in a heatproof bowl over a pot of simmering water, stirring until melted.
Step 4: Coat the Truffles
- Once the peanut butter balls are firm, it’s time to coat them in the melted chocolate. Using a fork or a toothpick, dip each peanut butter ball into the melted chocolate, making sure it’s fully coated. Let the excess chocolate drip off before placing it back onto the parchment-lined tray.
- Repeat this process for each truffle. If you want a little extra texture or flavor, now is the time to add crushed peanuts, pretzels, or a sprinkle of sea salt on top of the chocolate coating.
- Once all the truffles are coated, return the tray to the fridge to let the chocolate set for at least 30 minutes. The chocolate will harden as it cools, leaving you with smooth, chocolate-covered peanut butter bites.
Step 5: Enjoy!
- After the truffles have chilled and the chocolate has set, they’re ready to enjoy! Serve them immediately, or store them in an airtight container in the fridge. These truffles are perfect for snacking, sharing at a party, or gifting to loved ones.
Nutrition
- Serving Size: 24
- Calories: 180
- Sugar: 15g
- Fat: 11g
- Carbohydrates: 20g
- Protein: 5g
Conclusion
I can’t wait for you to try these Peanut Butter Truffles! They’re the perfect combination of creamy peanut butter and smooth chocolate, and they’re guaranteed to make everyone smile. Don’t forget to share your creations with me on social media—snap a photo and tag me! I’d love to see how yours turn out.
If you enjoyed this recipe, leave a comment below and let me know how it went! Feel free to experiment with toppings, chocolate types, or even the peanut butter itself to make it your own. Whether you’re making them for a special occasion or just as a treat for yourself, these truffles are sure to be a hit.

