Introduction
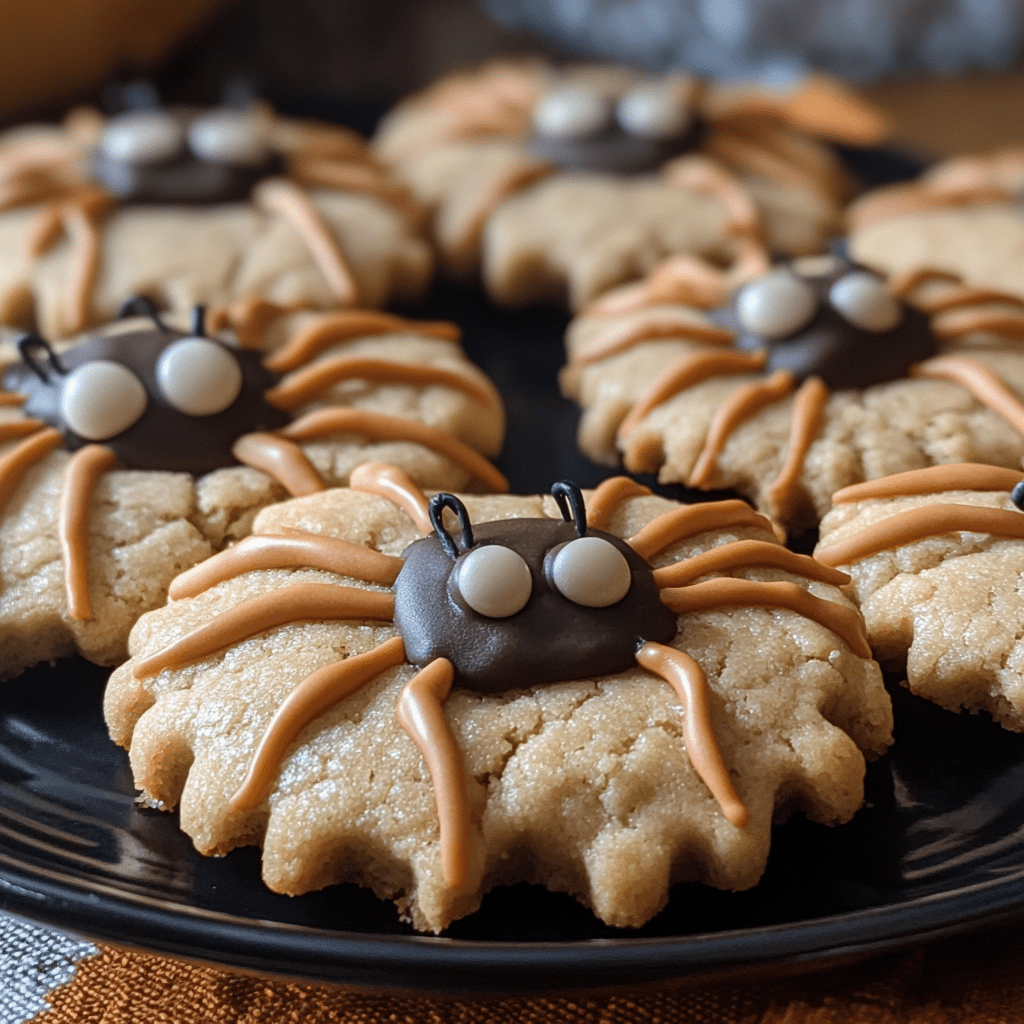
There’s something uniquely delightful about Halloween treats—maybe it’s the spooky decorations, the playful themes, or just the joy of indulging in something sweet! And when it comes to fun and delicious Halloween desserts, these Peanut Butter Spider Cookies are top of the list. With their soft, chewy peanut butter flavor, chocolatey accents, and adorable spider decorations, they are sure to become a Halloween favorite in your household.
I first stumbled upon this cookie recipe during a Halloween party planning frenzy a few years back. I wanted to create something that my kids would enjoy making—and eating! After a fun afternoon of cookie-making, we ended up with a batch of these spooky yet delicious treats, and they were a massive hit! The kids loved getting creative with the chocolate legs, and it turned into a fun family tradition that we look forward to every Halloween.
Not only are these cookies easy to make, but they also bring out your inner artist! So, whether you’re hosting a Halloween bash, attending a potluck, or just wanting to treat your family to something festive, these Peanut Butter Spider Cookies are the perfect blend of fun and flavor. Let’s dive into the details and get baking!
Why You’ll Love This Recipe
This recipe is a must-try for several reasons:
- Easy to Make: The ingredients are simple and straightforward, so even if you’re a beginner in the kitchen, you’ll feel confident whipping these up. Plus, they require minimal prep time!
- Family-Friendly: Kids and adults alike will adore these cookies. They are perfect for little hands to help shape the spiders, making it a great bonding activity. Who doesn’t love a cookie that doubles as a fun craft?
- Rich in Flavor: Peanut butter lovers rejoice! These cookies are packed with that rich, nutty flavor, while the chocolate adds a decadent twist. The combination is simply irresistible!
- Customizable: You can personalize these cookies in so many ways—add extra chocolate, use different candies for the spider legs, or even swap out peanut butter for almond or cashew butter for a fun twist.
- Adorable Presentation: With their cute spider design, these cookies are not just tasty—they’re also super fun to look at! They’ll be the star of any Halloween spread.
With these enticing qualities, you’ll definitely want to make these Peanut Butter Spider Cookies your go-to Halloween treat!
Preparation Time and Servings
- Total Time: Approximately 30-40 minutes (including baking and cooling time).
- Servings: This recipe yields about 24 cookies, perfect for sharing with friends or saving for later!
- Nutrition Facts: Calories per cookie: Approximately 150. Protein: 3g, Carbs: 18g, Fat: 7g.
Ingredients
Here’s what you’ll need to make these delightful cookies:
- 1 cup creamy peanut butter (drained)
The star of the show! Adds that rich, nutty flavor and moist texture. - 1 cup granulated sugar
Sweetens the cookies to perfection. - 1 large egg
Binds the ingredients together and helps the cookies rise. - 1 teaspoon vanilla extract
Enhances the overall flavor. - 1 teaspoon baking soda
Helps the cookies rise and become fluffy. - 1/2 cup chocolate chips
For an extra chocolatey goodness mixed into the dough. - Extra chocolate for decorating (I recommend chocolate melts or frosting)
To create those cute spider legs and eyes. - Candy eyes or chocolate-covered candies
To finish off the spider look!
Each ingredient plays a crucial role in making these cookies flavorful and fun!
Step-by-Step Instructions
1st Step: Preheat the Oven
- Start by preheating your oven to 350°F (175°C). This ensures that your cookies bake evenly and turn out perfectly golden.
2nd Step: Prepare Your Baking Sheet
- Line a baking sheet with parchment paper or a silicone baking mat. This prevents the cookies from sticking and makes cleanup a breeze.
3rd Step: Mix the Wet Ingredients
- In a large mixing bowl, combine 1 cup of creamy peanut butter, 1 cup of granulated sugar, 1 large egg, and 1 teaspoon of vanilla extract. Use a hand mixer or a whisk to blend everything together until it’s smooth and creamy. Don’t worry if the mixture feels a bit thick—that’s normal!
4th Step: Add the Dry Ingredients
- Next, sprinkle in 1 teaspoon of baking soda. Gently fold it into the peanut butter mixture until just combined. If you want to add 1/2 cup of chocolate chips, now’s the time! Stir them in until evenly distributed throughout the dough.
5th Step: Shape the Cookies
- Using a tablespoon or a cookie scoop, portion out the dough onto your prepared baking sheet. Leave about 2 inches between each cookie, as they will spread a bit while baking.
6th Step: Bake the Cookies
- Pop the baking sheet into your preheated oven and bake for about 10-12 minutes or until the edges are lightly golden. The centers may look slightly undercooked, but they’ll firm up as they cool!
7th Step: Cool the Cookies
- Once they’re out of the oven, let the cookies cool on the baking sheet for about 5 minutes before transferring them to a wire rack to cool completely. This step is crucial for achieving that perfect chewy texture.
8th Step: Decorate the Cookies
- Once your cookies are completely cool, it’s time to get creative! Melt some chocolate (or use chocolate frosting) in a small bowl. Using a piping bag or a zip-top bag with a corner snipped off, drizzle the melted chocolate to form spider legs. You can make four legs on each side of the cookie—be as artistic as you like!
- Finally, add a candy eye on each cookie to complete your spooky spider look.
9th Step: Enjoy!
- Your Peanut Butter Spider Cookies are ready to be enjoyed! They make for a perfect treat to share with family and friends. You might want to save a few for yourself—they won’t last long!
How to Serve
These Peanut Butter Spider Cookies are fantastic on their own, but here are some fun serving suggestions:
- Halloween Cookie Platter: Arrange your spider cookies on a festive platter with other Halloween treats, like pumpkin-shaped cookies or ghost cupcakes, for a themed dessert table.
- Milk Pairing: Serve with a tall glass of cold milk for a classic combination that everyone loves.
- Gift Them: Place them in a cute Halloween-themed bag or box and share them with neighbors, friends, or coworkers as a sweet gesture.
- Decorate with Sprinkles: If you have extra Halloween-themed sprinkles, sprinkle them on top of the cookies before the chocolate sets for added flair!
Additional Tips
To ensure your Peanut Butter Spider Cookies turn out perfectly every time, keep these tips in mind:
- Use Room Temperature Ingredients: For the best results, make sure your peanut butter and egg are at room temperature. This will help the mixture combine more smoothly.
- Don’t Overbake: To keep your cookies soft and chewy, avoid overbaking them. Remember, they’ll continue to cook a bit after you take them out of the oven.
- Adjust Sweetness: If you prefer less sweetness, reduce the sugar by a few tablespoons. Peanut butter is already quite rich, so you can afford to dial it down a bit.
- Experiment with Add-Ins: Feel free to customize the recipe! Add chopped nuts, different flavored chips, or even a touch of cinnamon for a unique spin on these cookies.
- Store Properly: To keep your cookies fresh, store them in an airtight container at room temperature. They’ll stay delicious for about a week (if they last that long!).
Recipe Variations
Here are a few creative variations to switch up your Peanut Butter Spider Cookies:
- Nut-Free Option: Swap the peanut butter for sun butter or any other nut-free spread for a delicious alternative that’s safe for school lunches.
- Gluten-Free Version: Use gluten-free flour in place of all-purpose flour to make these cookies gluten-free without sacrificing flavor.
- Chocolate Peanut Butter Swirl: For an extra chocolatey treat, mix in a swirl of chocolate hazelnut spread into the cookie dough before baking.
- Pumpkin Spice Twist: Add 1/2 teaspoon of pumpkin spice to the dough for a seasonal twist. It pairs beautifully with peanut butter!
- No-Bake Spider Cookies: If you’re looking for a quick and easy version, try making no-bake spider cookies using rice cereal, peanut butter, and melted chocolate. Shape them into spider forms and decorate!
Serving Suggestions
Complete your Halloween dessert table with these delightful pairings:
- Side Dishes: Serve with a simple green salad or a side of fruit to balance the sweetness of the cookies. Apple slices with caramel dip can also be a fun treat!
- Beverages: Pair with festive drinks like sparkling cider or a Halloween-themed punch to add to the spooky atmosphere. For adults, a rich hot chocolate or spiced apple cider would be perfect!
- Halloween Party: If you’re hosting a Halloween party, consider including activities like cookie decorating or a Halloween movie screening to keep the festive spirit alive. These cookies will be the perfect sweet treat to enjoy during the movie!
Frequently Asked Questions (FAQ)
1. Can I use crunchy peanut butter instead of creamy?
Absolutely! Crunchy peanut butter can be used in this recipe for added texture and a delightful crunch. Just keep in mind that it may affect the cookie’s overall consistency slightly, making them a bit more textured.
2. How should I store the cookies?
To keep your Peanut Butter Spider Cookies fresh, store them in an airtight container at room temperature. They will stay delicious for about a week. If you need to keep them longer, consider freezing them. Just make sure to layer them with parchment paper to prevent sticking.
3. Can I make these cookies gluten-free?
Yes! You can easily make these cookies gluten-free by using a gluten-free all-purpose flour blend. Just ensure that all other ingredients (like chocolate chips) are also gluten-free.
4. How can I make these cookies vegan?
To make vegan Peanut Butter Spider Cookies, substitute the egg with a flax egg (1 tablespoon of ground flaxseed mixed with 2.5 tablespoons of water, allowed to sit for 5 minutes until it thickens). Use vegan chocolate chips, and ensure your peanut butter is also vegan-friendly.
5. Can I freeze the dough?
Yes! If you want to prepare the dough ahead of time, you can freeze it. Shape the cookie dough into balls, place them on a baking sheet, and freeze until solid. Then transfer them to a freezer-safe bag or container. When you’re ready to bake, just pop them in the oven—no need to thaw!
6. What can I use for spider legs?
For spider legs, you can use various options like pretzel sticks, licorice strands, or even chocolate-covered pretzels for a sweet and salty combination. Get creative with your decorations!
7. Can I use different candies for decoration?
Definitely! Feel free to get creative with the candy you use for the spiders. Mini M&Ms, candy corn, or gummy worms can all make fun and colorful decorations.
8. Why are my cookies flat?
If your cookies come out flat, it could be due to a few reasons: too much sugar, not enough flour, or not chilling the dough before baking. Make sure to measure your ingredients accurately and consider chilling the dough for about 30 minutes before baking to help them hold their shape.
9. Can I add other mix-ins?
Absolutely! You can mix in other ingredients like chopped nuts, additional chocolate chips, or dried fruits to customize the flavor and texture of your cookies.
10. How do I make the chocolate melt smoothly?
To melt chocolate smoothly, use a double boiler or microwave in short intervals (about 30 seconds), stirring in between until fully melted. Adding a teaspoon of coconut oil or vegetable shortening can also help achieve a smoother consistency.
Print
Peanut Butter Spider Cookies
- Total Time: 40 minutes
Ingredients
Here’s what you’ll need to make these delightful cookies:
- 1 cup creamy peanut butter (drained)
The star of the show! Adds that rich, nutty flavor and moist texture. - 1 cup granulated sugar
Sweetens the cookies to perfection. - 1 large egg
Binds the ingredients together and helps the cookies rise. - 1 teaspoon vanilla extract
Enhances the overall flavor. - 1 teaspoon baking soda
Helps the cookies rise and become fluffy. - 1/2 cup chocolate chips
For an extra chocolatey goodness mixed into the dough. - Extra chocolate for decorating (I recommend chocolate melts or frosting)
To create those cute spider legs and eyes. - Candy eyes or chocolate-covered candies
To finish off the spider look!
Instructions
Step 1: Preheat the Oven
- Start by preheating your oven to 350°F (175°C). This ensures that your cookies bake evenly and turn out perfectly golden.
Step 2: Prepare Your Baking Sheet
- Line a baking sheet with parchment paper or a silicone baking mat. This prevents the cookies from sticking and makes cleanup a breeze.
Step 3: Mix the Wet Ingredients
- In a large mixing bowl, combine 1 cup of creamy peanut butter, 1 cup of granulated sugar, 1 large egg, and 1 teaspoon of vanilla extract. Use a hand mixer or a whisk to blend everything together until it’s smooth and creamy. Don’t worry if the mixture feels a bit thick—that’s normal!
Step 4: Add the Dry Ingredients
- Next, sprinkle in 1 teaspoon of baking soda. Gently fold it into the peanut butter mixture until just combined. If you want to add 1/2 cup of chocolate chips, now’s the time! Stir them in until evenly distributed throughout the dough.
Step 5: Shape the Cookies
- Using a tablespoon or a cookie scoop, portion out the dough onto your prepared baking sheet. Leave about 2 inches between each cookie, as they will spread a bit while baking.
Step 6: Bake the Cookies
- Pop the baking sheet into your preheated oven and bake for about 10-12 minutes or until the edges are lightly golden. The centers may look slightly undercooked, but they’ll firm up as they cool!
Step 7: Cool the Cookies
- Once they’re out of the oven, let the cookies cool on the baking sheet for about 5 minutes before transferring them to a wire rack to cool completely. This step is crucial for achieving that perfect chewy texture.
Step 8: Decorate the Cookies
- Once your cookies are completely cool, it’s time to get creative! Melt some chocolate (or use chocolate frosting) in a small bowl. Using a piping bag or a zip-top bag with a corner snipped off, drizzle the melted chocolate to form spider legs. You can make four legs on each side of the cookie—be as artistic as you like!
- Finally, add a candy eye on each cookie to complete your spooky spider look.
Step 9: Enjoy!
- Your Peanut Butter Spider Cookies are ready to be enjoyed! They make for a perfect treat to share with family and friends. You might want to save a few for yourself—they won’t last long!
Nutrition
- Serving Size: 24
- Calories: 150
- Fat: 7g
- Carbohydrates: 18g
- Protein: 3g
Conclusion
With their soft, chewy texture and adorable spider design, Peanut Butter Spider Cookies are sure to be a hit this Halloween. Not only are they easy to make, but they also offer a fun and creative way to get into the Halloween spirit. So gather your loved ones, put on some spooky tunes, and dive into a delightful baking adventure!
Whether you’re sharing them at a Halloween party, packing them in lunch boxes, or enjoying them with your family at home, these cookies will bring smiles all around. Plus, they make for fantastic gifts—who wouldn’t love receiving a box of these adorable treats?
I hope this recipe brings as much joy to your home as it has to mine. Happy Halloween baking, and enjoy every scrumptious bite of these Peanut Butter Spider Cookies!

