Mini Halloween Pizzas are the perfect spooky snack or dinner to get into the Halloween spirit! These bite-sized pizzas are fun to make, delicious to eat, and endlessly customizable with festive Halloween shapes and toppings. Whether you’re planning a Halloween party, cooking with the kids, or just looking for a creative twist on pizza night, these mini pizzas will add a little magic (and maybe a little fright!) to your table.
Each pizza can be shaped like a pumpkin, ghost, spider web, or even a mummy, topped with your favorite ingredients like pepperoni, mozzarella cheese, olives, and more. What I love about these mini pizzas is how simple they are to make. You can use pre-made pizza dough or get creative with English muffins or tortillas as the base. They’re a great interactive meal for families and perfect for getting kids involved in the kitchen!
Why You’ll Love These Mini Halloween Pizzas
Fun for All Ages: Kids and adults alike will enjoy making (and eating!) these Halloween-themed pizzas. It’s a hands-on activity that everyone can get involved in.
Customizable: You can easily swap out toppings and shapes to fit your tastes and creativity. Whether you want spooky spiders or cheesy mummies, the possibilities are endless.
Perfect for Parties: Mini pizzas make great finger food for Halloween parties, potlucks, or even as appetizers before trick-or-treating. They’re easy to eat, not too messy, and a crowd-pleaser.
Quick and Easy: Using pre-made pizza dough or tortillas saves time, and with a few simple toppings, these pizzas come together in under 30 minutes.
Kid-Friendly: This is a great recipe to make with kids. Let them shape the pizzas, add their favorite toppings, and get creative with spooky designs!
Prep Time and Servings
Total Time: 25-30 minutes (including baking time)
Servings: 12 mini pizzas
Calories per serving: 150-200 (depending on toppings and dough used)
Ingredients
- 1 lb pre-made pizza dough (store-bought or homemade) or 6 English muffins (or 6 small tortillas for a thin crust option)
- 1/2 cup pizza sauce (or marinara sauce)
- 1 1/2 cups shredded mozzarella cheese
- 1/2 cup pepperoni slices (mini or regular)
- 1/4 cup black olives (sliced)
- 1/4 cup green olives (optional, for decoration)
- 1/2 cup sliced mushrooms (optional)
- 1/2 cup bell peppers (sliced, for decorating)
- Fresh basil or spinach (for “greenery” or spider legs)
- Olive oil (for brushing the dough)
- Red pepper flakes, dried oregano, or Italian seasoning (optional, for extra flavor)
Step-by-Step Instructions
1. Prepare the Dough:
- If using pizza dough, preheat your oven to 400°F (200°C) and lightly grease or line a baking sheet with parchment paper.
- Roll out the pizza dough on a floured surface to about 1/4 inch thickness. Use cookie cutters or a small bowl to cut out 3-4 inch rounds from the dough. You can also freehand shapes like ghosts, pumpkins, or mummies. If you’re using English muffins or tortillas, there’s no need to shape them—just use as is.
2. Pre-Bake the Dough (If Using Raw Dough):
- If you’re using pizza dough, place the cut-out shapes onto the prepared baking sheet. Brush them lightly with olive oil and bake for 5 minutes, just until the dough starts to firm up. This will ensure the pizzas stay crispy when you add the toppings. For English muffins or tortillas, you can skip this step.
3. Add the Pizza Sauce:
- Spread about 1 tablespoon of pizza sauce onto each mini pizza. Leave a small border around the edges for the crust. If you want, you can sprinkle some dried oregano or Italian seasoning for extra flavor.
4. Decorate the Pizzas:
- Pumpkin Pizzas: Top with shredded mozzarella cheese. Add thin slices of pepperoni or orange bell peppers for the “pumpkin face” features. Use a small piece of green bell pepper or basil as the pumpkin’s “stem.”
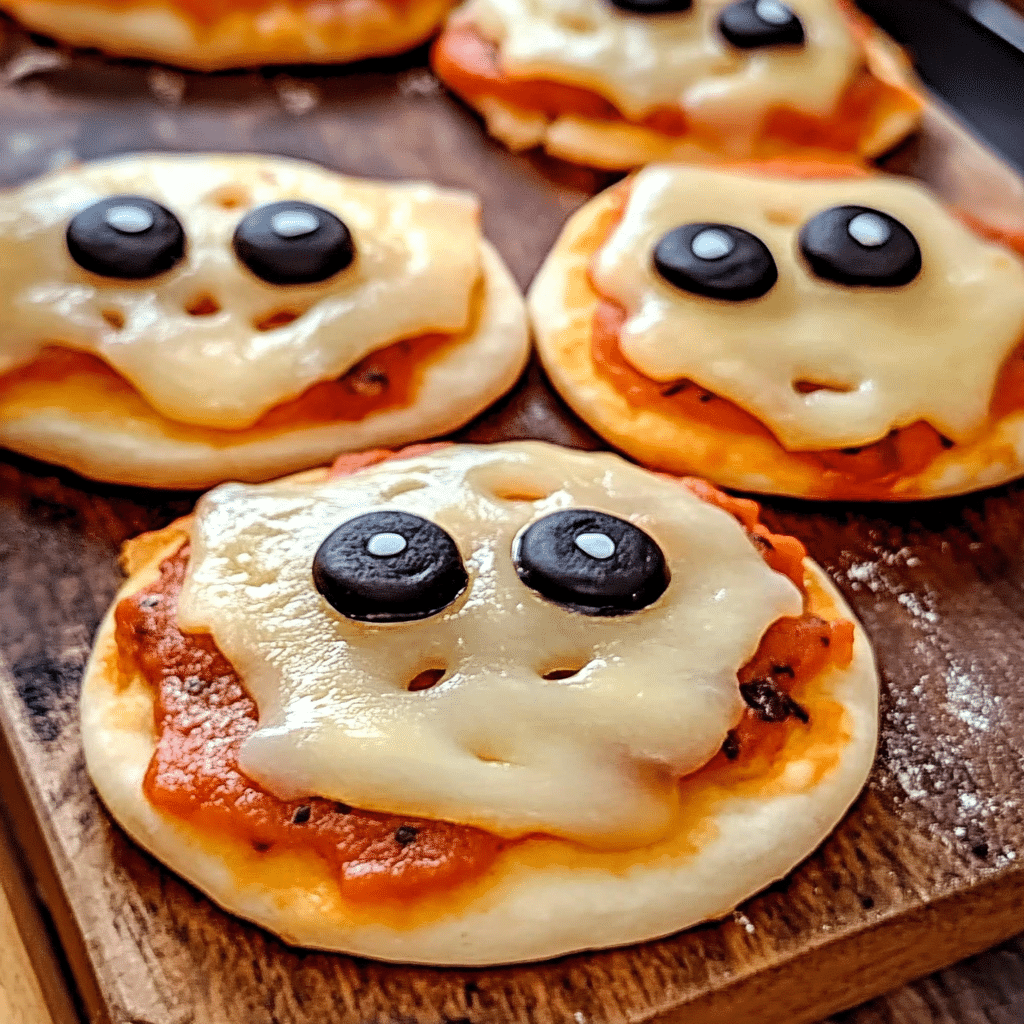
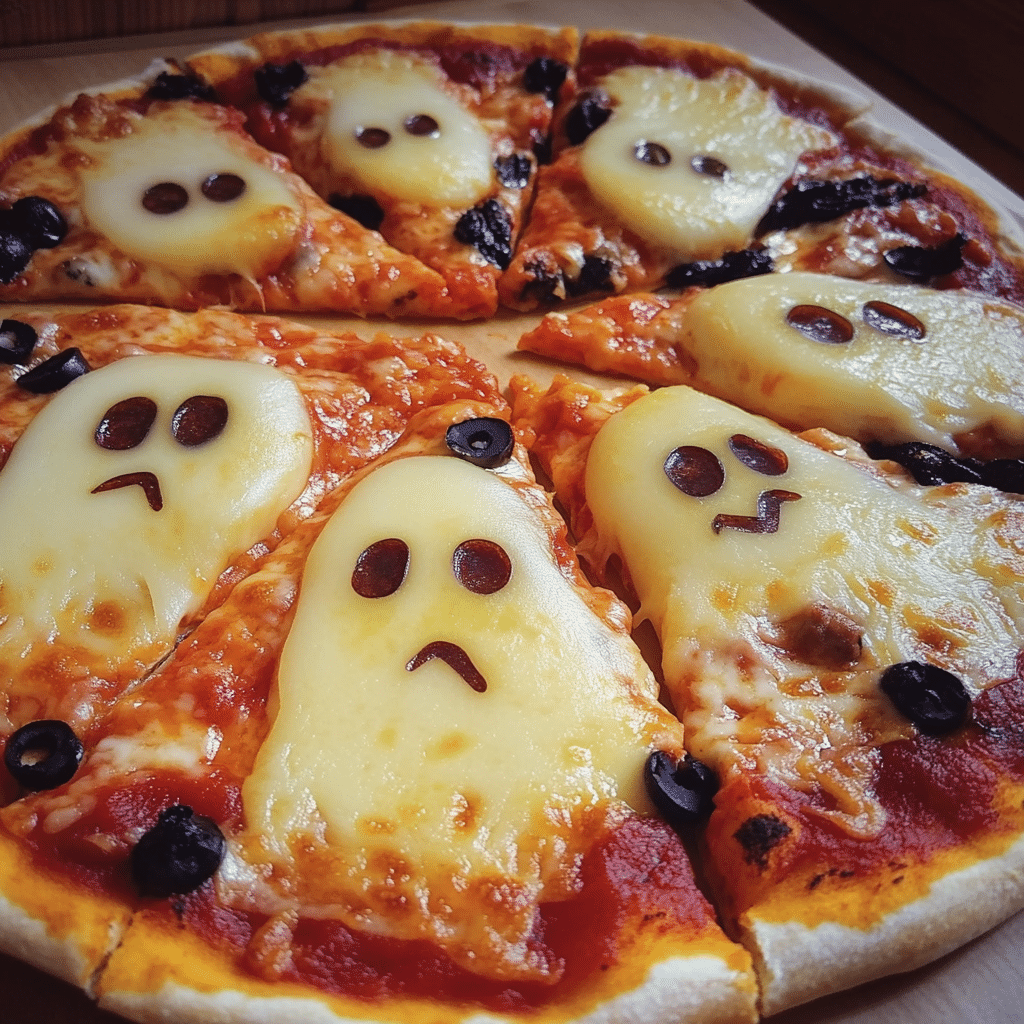
- Ghost Pizzas: For a ghost, use mozzarella cheese and shape it into a ghostly figure by leaving small gaps at the edges. Use black olive slices or small pepperoni pieces for the eyes and mouth.
- Mummy Pizzas: Lay strips of mozzarella cheese across the top of the pizza to create a mummy effect. Leave small gaps for the “eyes,” which you can make with black olives or pepperoni slices. You can add red pepper flakes for a “spicy mummy” if desired.
- Spider Web Pizzas: Create a spider web effect by using shredded mozzarella cheese in a spiral pattern. Use black olives cut in half to make the “spiders” or place them in the center. Add thin strips of basil or spinach as the spider’s legs.
5. Add Additional Toppings (Optional):
- Feel free to add more toppings like sliced mushrooms, bell peppers, or any other veggies you like. These can be used as decorations or just to add more flavor to your pizzas.
6. Bake the Mini Pizzas:
- Once your pizzas are decorated, bake them in the oven at 400°F (200°C) for 8-10 minutes, or until the cheese is melted and bubbly, and the edges are golden brown. If using English muffins or tortillas, check the pizzas after 5-7 minutes as they can bake more quickly.
7. Cool and Serve:
- Remove the mini pizzas from the oven and let them cool for a couple of minutes before serving. They’re best served warm but can be enjoyed at room temperature as well.
How to Serve
- At a Halloween Party: Arrange the mini pizzas on a large tray or serving platter decorated with Halloween-themed items like spider webs, bats, or mini pumpkins for a fun, festive look.
- As an Appetizer: These mini pizzas make perfect appetizers for a Halloween-themed dinner or event. Serve them alongside other spooky snacks like “witches’ fingers” (breadsticks) or “monster guacamole” with tortilla chips.
- For Dinner: Serve with a light salad or vegetable sticks for a balanced meal. These pizzas are great for a casual, family-friendly Halloween dinner.
Tips for Success
Use Room Temperature Dough: If you’re working with store-bought pizza dough, let it come to room temperature before rolling it out. This makes it easier to shape and handle.
Pre-Bake the Dough for Crispy Pizzas: Pre-baking the dough ensures that the pizzas will have a crispy base once you add the toppings. This is especially important if you’re using fresh pizza dough.
Get Creative with the Shapes: Have fun with cookie cutters or freehand designs! Try making bat-shaped pizzas with olive eyes or witch hats using black olives for decoration.
Layer the Cheese for Better Shapes: If you want your designs to stand out (like mummy strips or pumpkin faces), add the toppings in layers. For example, place the cheese first, then add the pepperoni or olive features on top so they don’t get buried under the melted cheese.
Recipe Variations
Gluten-Free Mini Pizzas: Use gluten-free pizza dough or tortillas to make this recipe gluten-free. Many stores carry gluten-free pizza bases or flatbreads that work perfectly for this.
Vegan Mini Pizzas: Substitute regular mozzarella with vegan cheese, and use plant-based pepperoni or other vegan toppings to make these mini pizzas entirely vegan.
Whole Wheat or Cauliflower Crust: For a healthier version, use whole wheat pizza dough or a cauliflower crust. You can often find pre-made versions of these in the grocery store, or make them from scratch if you prefer.
English Muffin Pizzas: For an even quicker version, use English muffins as the base. These are great for kids and bake up quickly with a nice, crunchy crust.
Spicy Halloween Pizzas: Add a bit of spice by using jalapeños, crushed red pepper flakes, or spicy sausage as toppings. You can make a “spicy mummy” pizza with extra heat for those who like a kick!
How to Store and Reheat
Storing: Store leftover mini pizzas in an airtight container in the refrigerator for up to 3 days. If you’re making them ahead for a party, you can prepare and bake them a few hours in advance and store them until serving.
Reheating: To reheat the pizzas, place them in a preheated oven at 350°F (175°C) for about 5 minutes, or until warmed through. You can also use a toaster oven or air fryer for quick reheating.
Special Equipment
- Cookie Cutters: Halloween-themed cookie cutters (like pumpkins, ghosts, or bats) will help create fun shapes for your mini pizzas.
- Rolling Pin: If you’re using pizza dough, a rolling pin is helpful to roll the dough out evenly.
- Baking Sheet: A large baking sheet will give you enough space to bake multiple mini pizzas at once.
FAQ
Can I make the dough from scratch?
Absolutely! If you prefer making your own dough from scratch, you can follow a basic pizza dough recipe. Simply mix 2 1/4 teaspoons of active dry yeast with 1 cup of warm water and a pinch of sugar. Let it sit for 5-10 minutes until it becomes frothy. Then, add 2 1/2 cups of flour, 1 teaspoon of salt, and 2 tablespoons of olive oil. Knead the dough for about 5-7 minutes until smooth and elastic. Let it rise for 1 hour before rolling it out for your mini pizzas. Homemade dough gives the pizzas a fantastic fresh flavor!
Can I freeze the mini pizzas?
Yes! To freeze the pizzas, assemble them (with all the toppings) but don’t bake them yet. Place them on a baking sheet and freeze until solid. Once frozen, transfer them to a freezer-safe container or bag and store for up to 2 months. When you’re ready to eat, bake them directly from frozen at 400°F (200°C) for about 12-15 minutes, or until fully heated and the cheese is melted.
Can I make these pizzas on the grill?
Definitely! Grilling mini pizzas gives them a delicious, smoky flavor and crispy crust. Preheat the grill to medium-high heat, and oil the grates lightly. Grill the dough rounds for 2-3 minutes on one side, then flip, add sauce and toppings, and grill for another 3-4 minutes with the lid closed, until the cheese is melted and the crust is golden and crisp.
What toppings work best for kids?
Kids usually love simple toppings like mozzarella cheese, pepperoni, and black olives. You can also use mini pepperonis or cut regular pepperoni into fun shapes. Veggies like bell peppers, mushrooms, and cherry tomatoes can also be cut into fun designs. For picky eaters, you can even make plain cheese pizzas and let them decorate their own with candy eyes or “spider” olives.
Can I make gluten-free mini pizzas?
Yes! You can use store-bought gluten-free pizza dough, gluten-free flatbreads, or tortillas as the base for the mini pizzas. Just follow the same instructions for assembling and baking the pizzas.
Conclusion
Mini Halloween Pizzas are the ultimate festive and fun treat for your Halloween celebration. They combine everyone’s favorite meal—pizza—with spooky decorations that bring the Halloween spirit to life. Whether you’re making pumpkin-shaped pizzas, ghostly figures, or mummy-inspired designs, these mini pizzas are easy to customize and incredibly fun to create.
They’re perfect for Halloween parties, family dinners, or even as a fun lunchbox treat. Plus, they’re quick and easy, taking less than 30 minutes to assemble and bake, so you can spend more time enjoying them with friends and family.
Get creative with your toppings, involve the kids in the kitchen, and make this Halloween extra special with these cute and delicious Mini Halloween Pizzas! Whether you’re a fan of classic pepperoni or want to try spooky spiders made of olives, these pizzas are sure to be a hit at any Halloween event. Happy haunting and happy eating! 🎃👻🍕
Print
Mini Halloween Pizzas
- Total Time: 35
Description
As Halloween approaches, I find myself in the kitchen more than usual, whipping up festive treats that not only taste great but also spark joy and excitement in my family. This year, I decided to try something new: Mini Halloween Pizzas! Let me tell you, they were a massive hit! Each little pizza became a canvas for creativity, and my family had so much fun decorating them. From the giggles while spreading the sauce to the delightful chaos of adding toppings, it felt more like a fun family activity than just cooking. My kids loved every bite and were so proud of their spooky creations. If you’re looking for a fun, easy, and delicious way to celebrate Halloween, these mini pizzas are your answer!
Ingredients
Gather your ingredients and get ready for a spooktacular time! Here’s what you’ll need for these mini Halloween pizzas:
- Pizza Dough: You can use store-bought or make your own from scratch (which I highly recommend if you have the time!).
- Pizza Sauce: 1 cup (store-bought or homemade).
- Shredded Mozzarella Cheese: 2 cups.
- Sliced Olives: For spooky eyes.
- Pepperoni: Cut into fun shapes with cookie cutters (pumpkins, bats, or ghosts!).
- Bell Peppers: Sliced into strips for some vibrant colors.
- Fresh Basil or Spinach: For a touch of green (and added nutrition!).
- Cornmeal: For dusting the baking sheet (optional).
- Olive Oil: For brushing.
Instructions
Now that you have everything ready, let’s get into the fun part—making these mini Halloween pizzas!
- Preheat Your Oven: Preheat your oven to 425°F (220°C). This is the perfect temperature for getting that golden crust!
- Prepare the Dough: If you’re using store-bought pizza dough, roll it out on a floured surface. If you’re feeling adventurous, you can make your own dough (just follow your favorite recipe!). Aim for small, individual-sized circles (about 4 inches in diameter). You can use a cookie cutter or a glass to help with this.
- Add Sauce and Cheese: Place the mini pizza bases on a baking sheet lined with parchment paper (or dusted with cornmeal). Spread a generous tablespoon of pizza sauce on each base, leaving a little edge for the crust. Sprinkle a handful of shredded mozzarella on top.
- Get Creative with Toppings: This is where the fun really begins! Use sliced olives for eyes, and add your pepperoni shapes, bell pepper strips, and any other toppings to create spooky faces or Halloween scenes.
- Bake: Brush the edges of the crust lightly with olive oil for that beautiful golden color. Bake in the preheated oven for about 12-15 minutes, or until the cheese is melted and bubbly, and the crust is golden brown.
- Cool and Serve: Let them cool for a couple of minutes before serving. They’re perfect for little hands (and big ones, too!).
- Prep Time: 20
- Cook Time: 15
Nutrition
- Serving Size: 8
- Calories: 250

