Introduction
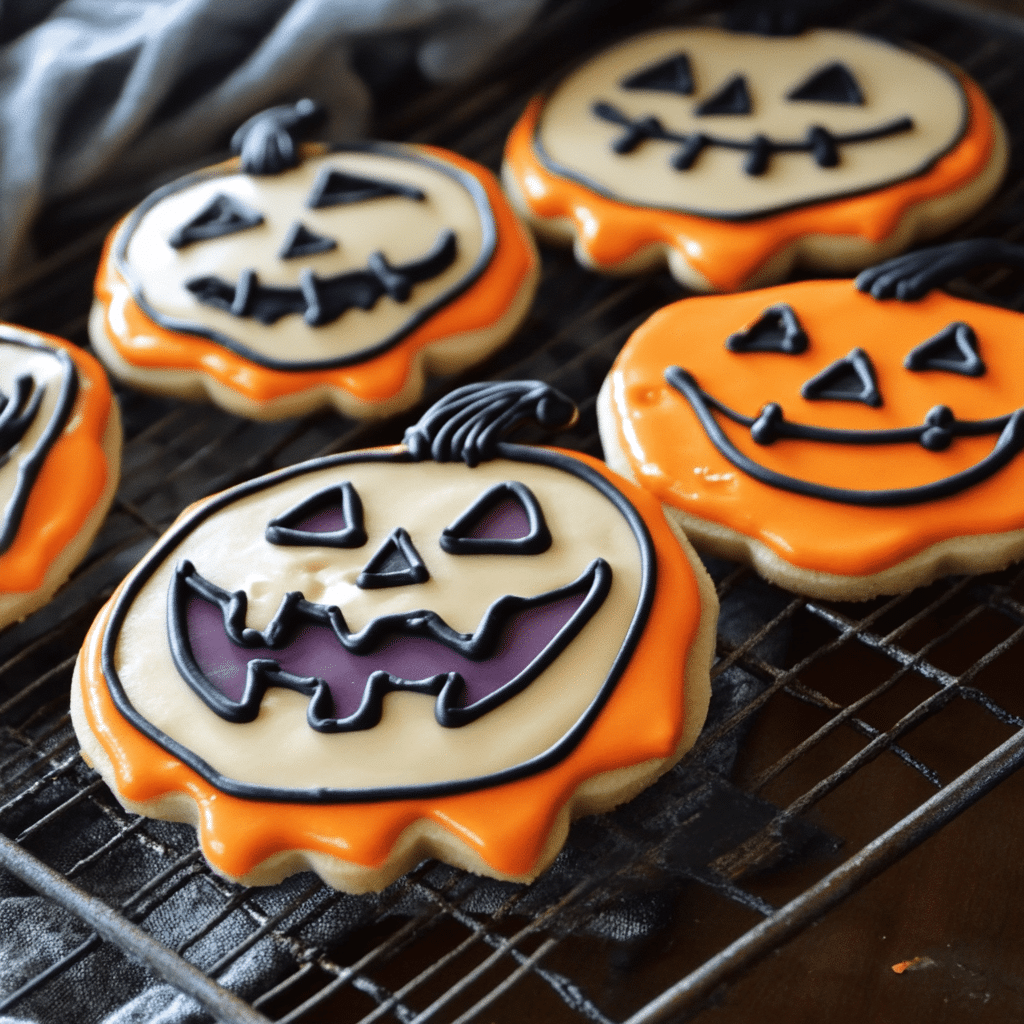
Halloween is a time for costumes, spooky decorations, and, of course, treats! While candy is a staple of this haunted holiday, there’s something truly special about homemade Halloween Sugar Cookies Frosted in Buttercream. These cookies not only satisfy your sweet tooth but also provide a canvas for your creativity, allowing you to create festive designs that delight both kids and adults alike.
I remember the first time I baked Sugar Cookies Frosted in Buttercream with my family. The kitchen was filled with laughter, flour dust, and the sweet scent of vanilla. We decorated each cookie with colorful icing, transforming simple sugar cookies into ghoulish delights. It quickly became a cherished tradition, and now, I look forward to baking and decorating these cookies every year as the days grow shorter and the leaves turn crisp.
In this article, I’ll guide you through the process of making these delectable Halloween Sugar Cookies Frosted in Buttercream from scratch. From the dough to the frosting and the fun decorations, you’ll be ready to impress your friends and family with these delightful treats that embody the spirit of Halloween!
Why You’ll Love This Recipe
There so many reason to love this Halloween Sugar Cookies Frosted in Buttercream:
- Versatile Designs: The sugar cookies can be cut into various shapes—think pumpkins, ghosts, bats, and more! You can use your favorite cookie cutters to create a spooky cookie platter.
- Deliciously Sweet: With their buttery flavor and soft texture, these cookies are simply irresistible.
- Fun for Everyone: Decorating cookies is a fantastic activity to share with friends and family, making it a perfect Halloween gathering or party idea.
- Make-Ahead Option: The cookie dough can be made in advance, allowing you to save time on the day you plan to bake and decorate.
- Kid-Friendly: Kids love helping in the kitchen! Let them roll out the dough, cut shapes, and decorate their own cookies.
Preparation Time and Servings
- Total Time: 2 hours (including baking and cooling)
- Servings: About 24 cookies
- Calories per cookie: Approximately 150 calories (depending on decoration)
Key Nutrients
- Protein: 1g
- Carbohydrates: 20g
- Fat: 7g
- Fiber: 0g
Ingredients
To create these delightful Halloween Sugar Cookies Frosted in Buttercream, you’ll need:
Sugar Cookies:
- 2 ¾ cups all-purpose flour
- 1 teaspoon baking powder
- ½ teaspoon salt
- 1 cup unsalted butter, softened
- 1 ½ cups granulated sugar
- 1 large egg
- 1 teaspoon vanilla extract
- ½ teaspoon almond extract (optional)
- Food coloring (optional)
Buttercream Frosting:
- 1 cup unsalted butter, softened
- 4 cups powdered sugar
- 2 tablespoons heavy cream or milk
- 1 teaspoon vanilla extract
- Food coloring (various colors for decoration)
- Halloween-themed sprinkles (optional)
Ingredient Highlights
- Butter: Using unsalted butter ensures you have control over the saltiness of your cookies and frosting.
- Granulated Sugar: This ingredient gives the cookies their sweetness and contributes to their beautiful texture.
- Powdered Sugar: Essential for the frosting, it creates a smooth, sweet topping that can be easily colored and piped.
- Food Coloring: A fun way to customize your cookies for Halloween. Use various colors to create spooky designs!
Step-by-Step Instructions
Here’s how to make your very own Halloween Sugar Cookies Frosted in Buttercream from scratch:
1st Step: Make the Sugar Cookie Dough
- Preheat the Oven: Start by preheating your oven to 350°F (175°C) and lining two baking sheets with parchment paper.
- Mix Dry Ingredients: In a medium bowl, whisk together the flour, baking powder, and salt. Set aside.
- Cream Butter and Sugar: In a large mixing bowl, beat the softened butter and granulated sugar together until light and fluffy (about 3-4 minutes).
- Add Egg and Extracts: Beat in the egg, vanilla extract, and almond extract (if using) until well combined.
- Combine Wet and Dry Ingredients: Gradually add the dry ingredients to the wet mixture, mixing until just combined. Be careful not to overmix!
- Chill the Dough: Divide the dough into two discs, wrap them in plastic wrap, and refrigerate for at least 30 minutes. This step helps the cookies maintain their shape during baking.
2nd Step: Roll and Cut Out the Cookies
- Roll the Dough: Once chilled, take one disc of dough out of the fridge. On a lightly floured surface, roll it out to about ¼ inch thickness.
- Cut Out Shapes: Use your favorite Halloween cookie cutters to cut out shapes. Place the cutouts onto the prepared baking sheets, spacing them about 2 inches apart.
- Bake the Cookies: Bake the cookies in the preheated oven for 8-10 minutes or until the edges are lightly golden. Keep an eye on them; you want them to stay soft and not brown too much.
- Cool the Cookies: Remove the cookies from the oven and let them cool on the baking sheets for a few minutes before transferring them to a wire rack to cool completely.
3rd Step: Make the Buttercream Frosting
- Beat the Butter: In a large mixing bowl, beat the softened butter until creamy.
- Add Powdered Sugar: Gradually add the powdered sugar, mixing until well incorporated. The mixture will be crumbly at first.
- Add Cream and Vanilla: Add the heavy cream (or milk) and vanilla extract, and beat on high speed for about 3 minutes until the frosting is light and fluffy. Adjust the consistency with more cream if needed.
- Color the Frosting: Divide the frosting into bowls and use food coloring to create different colors for decorating your cookies.
4th Step: Decorate the Cookies
- Frost the Cookies: Once the cookies are completely cooled, use a spatula or piping bag to frost each cookie with your desired color of buttercream.
- Add Fun Designs: Get creative! Use different colors to pipe on designs like spooky faces, web patterns, or jack-o’-lanterns. Don’t forget to sprinkle some Halloween-themed sprinkles for an extra festive touch!
- Let Them Set: Allow the decorated cookies to sit at room temperature for about 30 minutes to let the frosting set before serving or storing.
How to Serve
These Halloween Sugar Cookies Frosted in Buttercream are perfect for sharing! Here are a few ideas for serving them:
- Cookie Platters: Arrange your decorated cookies on a spooky-themed platter for a festive display at your Halloween party.
- Party Favors: Wrap individual cookies in clear bags tied with colorful ribbons as delightful party favors for guests.
- Halloween Treats: Serve them as part of a Halloween dessert table alongside other treats like cupcakes, candy, and desserts.
Additional Tips
Here are a few tips to ensure your Halloween Sugar Cookies Frosted in Buttercream turns out perfectly every time
- Chill the Dough: Chilling the dough not only helps the cookies maintain their shape but also enhances their flavor. You can chill the dough overnight if you want to prepare ahead of time.
- Piping Bags vs. Spatula: If you’re new to decorating cookies, using a spatula for spreading the frosting is perfectly fine. If you feel adventurous, try using piping bags for more intricate designs!
- Make It a Family Activity: Get the kids involved in the decorating process! They’ll love personalizing their cookies and letting their creativity shine.
Recipe Variations
Want to try something different? Here are a few variations of this Halloween sugar cookie recipe you can explore:
- Spice It Up: Add a teaspoon of cinnamon or nutmeg to the cookie dough for a warm, spiced flavor.
- Chocolate Variation: Substitute half a cup of the flour with cocoa powder to make chocolate sugar cookies. Frost them with orange buttercream for a Halloween twist.
- Gluten-Free Option: Substitute the all-purpose flour with a gluten-free flour blend for a gluten-free version of these cookies.
Freezing and Storage
These cookies can be stored and frozen for later enjoyment:
- Storage: Store the decorated cookies in an airtight container at room temperature for up to a week. For best results, place parchment paper between layers to prevent sticking.
- Freezing: If you want to make cookies ahead of time, you can freeze the unbaked dough. Wrap the dough tightly in plastic wrap and store it in the freezer for up to 3 months. When ready to bake, thaw the dough in the refrigerator overnight, roll it out, and cut out shapes as usual.
Special Equipment
To make these Halloween Sugar Cookies Frosted in Buttercream, you’ll need a few handy tools:
- Mixing Bowls: For mixing your dough and frosting.
- Rolling Pin: To roll out the cookie dough evenly.
- Cookie Cutters: Get a set of Halloween-themed cookie cutters for the best results.
- Piping Bags and Tips: If you’re decorating with icing, piping bags and tips are great for precision.
FAQ Section
- Can I use store-bought frosting?
Absolutely! If you’re short on time, store-bought frosting can be a convenient option. Just add food coloring to customize it for Halloween. - Can I make the dough ahead of time?
Yes! You can prepare the dough a day or two in advance. Just keep it refrigerated until you’re ready to roll and cut the cookies. - What’s the best way to store leftover cookies?
Keep the cookies in an airtight container at room temperature. You can also freeze them for longer storage.

Halloween sugar cookies frosted in buttercream
- Total Time: 2 hours
Ingredients
To create these delightful Halloween sugar cookies, you’ll need:
For the Sugar Cookies:
- 2 ¾ cups all-purpose flour
- 1 teaspoon baking powder
- ½ teaspoon salt
- 1 cup unsalted butter, softened
- 1 ½ cups granulated sugar
- 1 large egg
- 1 teaspoon vanilla extract
- ½ teaspoon almond extract (optional)
- Food coloring (optional)
For the Buttercream Frosting:
- 1 cup unsalted butter, softened
- 4 cups powdered sugar
- 2 tablespoons heavy cream or milk
- 1 teaspoon vanilla extract
- Food coloring (various colors for decoration)
- Halloween-themed sprinkles (optional)
Instructions
Step 1: Make the Sugar Cookie Dough
- Preheat the Oven: Start by preheating your oven to 350°F (175°C) and lining two baking sheets with parchment paper.
- Mix Dry Ingredients: In a medium bowl, whisk together the flour, baking powder, and salt. Set aside.
- Cream Butter and Sugar: In a large mixing bowl, beat the softened butter and granulated sugar together until light and fluffy (about 3-4 minutes).
- Add Egg and Extracts: Beat in the egg, vanilla extract, and almond extract (if using) until well combined.
- Combine Wet and Dry Ingredients: Gradually add the dry ingredients to the wet mixture, mixing until just combined. Be careful not to overmix!
- Chill the Dough: Divide the dough into two discs, wrap them in plastic wrap, and refrigerate for at least 30 minutes. This step helps the cookies maintain their shape during baking.
Step 2: Roll and Cut Out the Cookies
- Roll the Dough: Once chilled, take one disc of dough out of the fridge. On a lightly floured surface, roll it out to about ¼ inch thickness.
- Cut Out Shapes: Use your favorite Halloween cookie cutters to cut out shapes. Place the cutouts onto the prepared baking sheets, spacing them about 2 inches apart.
- Bake the Cookies: Bake the cookies in the preheated oven for 8-10 minutes or until the edges are lightly golden. Keep an eye on them; you want them to stay soft and not brown too much.
- Cool the Cookies: Remove the cookies from the oven and let them cool on the baking sheets for a few minutes before transferring them to a wire rack to cool completely.
Step 3: Make the Buttercream Frosting
- Beat the Butter: In a large mixing bowl, beat the softened butter until creamy.
- Add Powdered Sugar: Gradually add the powdered sugar, mixing until well incorporated. The mixture will be crumbly at first.
- Add Cream and Vanilla: Add the heavy cream (or milk) and vanilla extract, and beat on high speed for about 3 minutes until the frosting is light and fluffy. Adjust the consistency with more cream if needed.
- Color the Frosting: Divide the frosting into bowls and use food coloring to create different colors for decorating your cookies.
Step 4: Decorate the Cookies
- Frost the Cookies: Once the cookies are completely cooled, use a spatula or piping bag to frost each cookie with your desired color of buttercream.
- Add Fun Designs: Get creative! Use different colors to pipe on designs like spooky faces, web patterns, or jack-o’-lanterns. Don’t forget to sprinkle some Halloween-themed sprinkles for an extra festive touch!
- Let Them Set: Allow the decorated cookies to sit at room temperature for about 30 minutes to let the frosting set before serving or storing.
Nutrition
- Serving Size: 24 cookies
- Calories: 150 calories
- Fat: 7g
- Carbohydrates: Carbohydrates:
- Fiber: 0g
- Protein: 1g
Conclusion
I hope you’re as excited as I am to whip up a batch of these delicious Halloween Sugar Cookies Frosted in Buttercream! They’re not just a treat; they’re a way to create sweet memories with your loved ones. Gather your ingredients, roll up your sleeves, and let the baking begin! Whether you’re hosting a Halloween party or just want to share a festive delight, these cookies are sure to bring smiles and joy to everyone who tries them. Happy baking, and may your Halloween be filled with sweetness and fun!

