
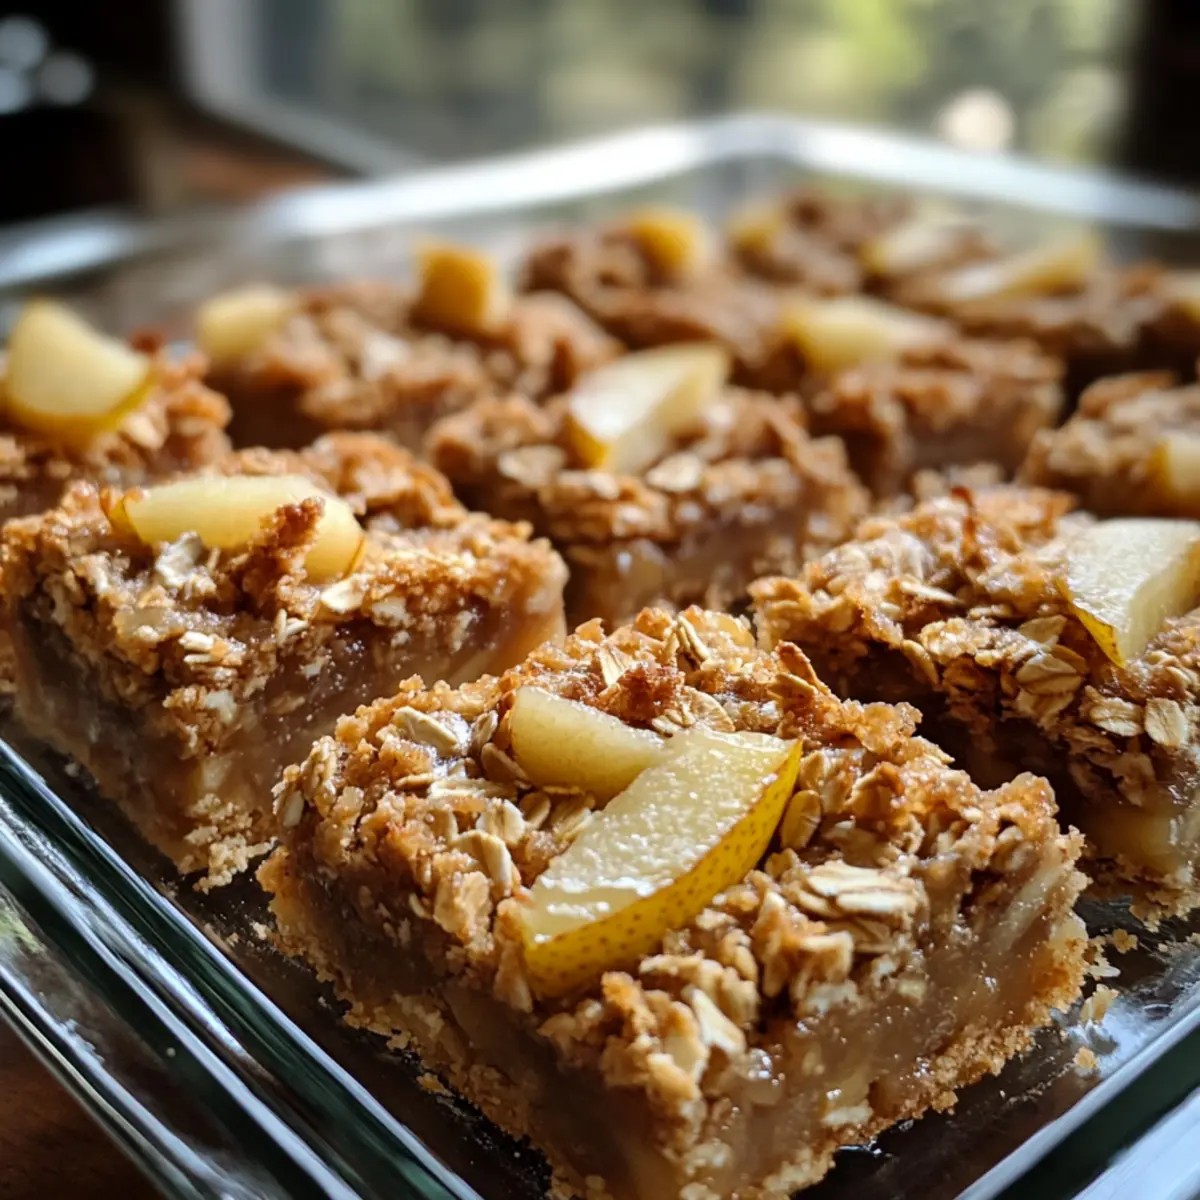
There’s something irresistibly cozy about the scent of baked pears mingling with warm oats fresh from the oven—like a gentle hug in dessert form. When I first tried these Baked Pear and Oat Bars, I was looking for a wholesome snack that satisfied my sweet tooth without the guilt of processed sugars. What I found was a perfect balance of tender, juicy pear pieces nestled in a golden, crumbly oat crust that’s surprisingly simple to whip up. Whether you’re craving a breakfast treat, an afternoon pick-me-up, or a shareable dessert that pleases a crowd, these bars hit every mark with their natural sweetness and satisfying texture. Best of all, they store well, making them my go-to recipe for busy days when homemade goodness is exactly what I need.
Why choose Baked Pear and Oat Bars?
Wholesome simplicity: This recipe uses natural ingredients and minimal prep for a stress-free baking experience. Cozy flavor: Juicy baked pears blend perfectly with hearty oats, creating a comforting warmth. Guilt-free sweetness: No processed sugars—just the natural sweetness of fruit. Versatile enjoyment: Perfect for breakfast, snacking, or dessert, anytime you want a wholesome treat. Make-ahead convenience: These bars store beautifully, ready to brighten your busy days.
Baked Pear and Oat Bars Ingredients
For the Pear Filling
- Fresh ripe pears – Choose pears that are tender but not mushy for the perfect juicy texture.
- Lemon juice – Adds brightness and prevents the pears from browning.
- Cinnamon – Brings warm spice notes that complement the natural sweetness of pears.
- Maple syrup – A natural sweetener that enhances the filling’s flavor without processed sugars.
For the Oat Crust
- Old-fashioned rolled oats – Provide a hearty, chewy base with a lovely rustic texture.
- Whole wheat flour – Adds a nutty depth and wholesome fiber to the crust.
- Ground flaxseed – Acts as a binder and boosts nutritional value for a guilt-free treat.
- Coconut oil – Gives a rich, buttery flavor while keeping the bars dairy-free.
- Baking powder – Helps the oat crust rise slightly for a tender crumb.
- Sea salt – Balances sweetness and enhances all other flavors.
For Optional Topping
- Chopped walnuts or pecans – Add crunch and a toasty contrast to the soft filling.
- Honey drizzle – For a little extra natural sweetness before serving.
These Baked Pear and Oat Bars combine hearty oats and juicy fruit with just a touch of natural sweetening, making them a perfect guilt-free indulgence your family will love!
How to Make Baked Pear and Oat Bars
- Preheat Oven: Preheat to 350°F (175°C) on the center oven rack and line an 8×8-inch pan with parchment paper for even baking and easy removal.
For the Oat Crust: - Combine Dry Ingredients: In a bowl, stir 1½ cups old-fashioned oats, ¾ cup whole wheat flour, 2 tbsp ground flaxseed, 1 tsp baking powder, and a pinch of sea salt.
- Add Coconut Oil: Pour ⅓ cup melted coconut oil into the dry mix, stirring until the crumbly, fragrant dough holds together when pressed firmly.
For the Pear Filling: - Prepare Pears: Peel, core, and dice 3 ripe pears, then toss with 1 tbsp lemon juice, 1 tsp cinnamon, and 2 tbsp maple syrup.
- Press Base: Firmly press half of the oat mixture into the prepared pan, creating an even, smooth, compact base layer from edge to edge.
- Layer Filling: Spread the pear pieces evenly over the crust, ensuring juicy, vibrant bits fill every corner for a sweet, fruity layer.
- Top Crumble: Sprinkle the remaining oat mixture generously across the pears, gently pressing so it clings in golden, rustic clusters for a tantalizing crunch.
- Bake & Cool: Bake for 25–30 minutes until golden brown and bubbling with aroma, then cool in the pan for 15 minutes to rest before slicing.
Optional: Sprinkle chopped walnuts or a light honey drizzle before serving.
Exact quantities are listed in the recipe card below.
What to Serve with Baked Pear and Oat Bars?
Elevate your cozy dessert experience with delightful accompaniments that enhance every bite.
- Greek Yogurt: A dollop of creamy yogurt adds a tangy contrast that complements the sweetness and moisture of the bars.
- Chai Tea: This warm, spiced beverage pairs perfectly with the cozy flavors of the baked bars, creating a comforting afternoon treat.
- Fresh Berries: Juicy blueberries or raspberries add a burst of freshness and acidity, balancing the rich, sweet notes of the bars beautifully.
- Honey Drizzle: A touch of honey on top enhances the natural sweetness of the pears, making every bite feel indulgent.
- Chopped Nuts: Sprinkle with walnuts or pecans for a crunchy texture that contrasts the soft, tender bars and brings an extra layer of flavor.
- Cinnamon Sugar: A light dusting of cinnamon sugar can elevate the bars to a new level of decadence, making them feel extra special.
- Vanilla Ice Cream: For a warm-cold combination, serve with vanilla ice cream that melts into the warm bars, creating a delightful fusion of flavors.
- Herbal Tea: A soothing cup of herbal tea refreshes the palate while allowing the flavors of the bars to shine through.
- Almond Milk: Enjoy with a glass of chilled almond milk for a nutty twist that finishes your snack or dessert in style.
- Caramel Sauce: Drizzle homemade or store-bought caramel sauce for a decadent treat that adds richness to the overall experience.
Expert Tips for Baked Pear and Oat Bars
- Choose ripe pears: Use pears that are tender yet firm to avoid a mushy filling and ensure juicy, flavorful bites in your Baked Pear and Oat Bars.
- Press crust firmly: Firmly pressing the oat crust base prevents cracking and keeps bars intact when sliced and served.
- Even pear layering: Spread diced pears evenly to achieve consistent sweetness and moisture distribution throughout every bar.
- Watch the bake time: Overbaking can dry out the bars; pull them from the oven once golden and bubbly for that perfect tender crumb.
- Cool before slicing: Letting the bars rest fully cools and firms the crust for neat, beautiful slices every time.
How to Store and Freeze Baked Pear and Oat Bars
Fridge: Store the cooled Baked Pear and Oat Bars in an airtight container in the fridge for up to 5 days to keep them fresh and moist.
Freezer: Freeze individual bars wrapped tightly in plastic wrap and then placed in a freezer-safe bag for up to 3 months. Thaw in the fridge overnight before enjoying.
Reheating: For a warm treat, reheat bars in the microwave for 15-20 seconds or in the oven at 350°F (175°C) for about 10 minutes, enhancing that cozy baked aroma.
Room Temperature: If you’re enjoying them right away, keep the bars at room temperature for up to 2 days in a covered dish.
Make Ahead Options
These Baked Pear and Oat Bars are perfect for meal prep enthusiasts! You can prepare the oat crust and pear filling up to 48 hours in advance. Simply follow the instructions to mix the dry ingredients for the crust, combine them with the wet ingredients, and store the mixture in an airtight container in the refrigerator. For the pear filling, peel, core, and dice the pears, then toss them with lemon juice, cinnamon, and maple syrup, storing them separately to prevent browning. When you’re ready to bake, just press the crisp base into the pan, layer the pear filling, top with the remaining oat mixture, and bake as directed for delicious, fresh results—ideal for busy weeknights or snack cravings!
Variations & Substitutions for Baked Pear and Oat Bars
Feel free to explore these delightful variations that elevate your homemade bars and cater to your tastes!
- Nut-Free: Substitute coconut oil with sunflower oil and leave out nuts to create a safe, nut-free treat.
- Gluten-Free: Use certified gluten-free oats and flour to make these bars suitable for those with gluten sensitivities. Enjoy the same comforting taste without compromise.
- Fruit Swaps: Replace pears with ripe peaches or apples for a different fruity flair. Each fruit brings its unique sweetness, transforming the bars into a whole new experience.
- Spice It Up: Add a pinch of nutmeg or ginger to the filling for a warming spice twist that complements the cinnamon beautifully.
- Sweetener Options: Swap maple syrup with honey or agave nectar for a slight variation in sweetness—it’s all about what you have on hand!
- Add Ins: Fold in some dark chocolate chips or dried cranberries into the oat mixture for a decadent touch. These little additions create pockets of flavor that surprise with every bite.
- Extra Crunch: Top with a mix of seeds such as pumpkin or sunflower seeds before baking. They add delightful crunch and boost nutrition effortlessly.
- Vegan Twist: Replace the honey drizzle with a splash of coconut cream for a rich, creamy finish that maintains the bars’ dairy-free goodness.
With these variations, feel empowered to create your perfect version of Baked Pear and Oat Bars tailored just for you!
Easy Baked Pear and Oat Bars Recipe FAQs
How do I select the best pears for Baked Pear and Oat Bars?
Choose pears that are ripe but still firm—think tender when gently pressed but without dark spots all over. Bartlett or Anjou pears work beautifully, lending juicy sweetness without turning mushy during baking. Avoid underripe pears, as they can be too crunchy and less flavorful.
What’s the best way to store leftover baked pear and oat bars?
Absolutely! Store cooled bars in an airtight container in the fridge, where they stay fresh and moist for up to 5 days. If you want to keep them on the countertop, keep them covered at room temperature for no more than 2 days to maintain their delightful texture and prevent drying out.
Can I freeze these bars for longer storage? How?
Very much so! First, let the bars cool completely. Then slice and wrap each bar tightly in plastic wrap to prevent freezer burn. Place the wrapped bars in a freezer-safe zip-top bag or container, and freeze for up to 3 months. When you’re ready to enjoy, thaw them overnight in the fridge and reheat gently if desired—like 15–20 seconds in the microwave or 10 minutes at 350°F in the oven.
What if my oat crust crumbles when slicing?
This happens if the crust wasn’t pressed firmly before baking or if the bars hadn’t cooled enough. To prevent this, make sure you press the oat dough firmly into the pan before adding the pear filling. After baking, let the bars cool completely (at least 15 minutes) so the crust firms up nicely, allowing for clean, neat slices. Using a sharp knife and wiping it after each cut helps, too!
Are these bars safe for pets or people with food allergies?
These bars contain walnuts or pecans only if you add them as an optional topping—otherwise, they are nut-free! If you or your guests have nut allergies, simply skip the nuts. Maple syrup is a natural sweetener safe for humans but not recommended for pets, especially dogs. Always avoid sharing treats with pets unless you know the ingredients are safe for them.

Easy Baked Pear and Oat Bars: A Cozy, Guilt-Free Treat
Ingredients
Equipment
Method
- Preheat to 350°F (175°C) and line an 8×8-inch pan with parchment paper.
- In a bowl, stir together oats, flour, flaxseed, baking powder, and sea salt.
- Pour melted coconut oil into the dry mix, stirring until dough holds together.
- Peel, core, and dice pears; toss with lemon juice, cinnamon, and maple syrup.
- Press half of the oat mixture into the bottom of the pan.
- Spread diced pears evenly over the crust.
- Sprinkle remaining oat mixture over the pears, pressing gently.
- Bake for 25-30 minutes until golden brown and bubbling.
- Cool in the pan for 15 minutes before slicing.