Introduction
Christmas is the time of year when everyone’s baking spirit truly comes alive, and there’s just something about the aroma of freshly baked goods that instantly makes you feel like you’re in a holiday movie. But sometimes, life gets busy, and we need a shortcut to the delicious magic of the season. That’s where these Blue Christmas Truffles come in!
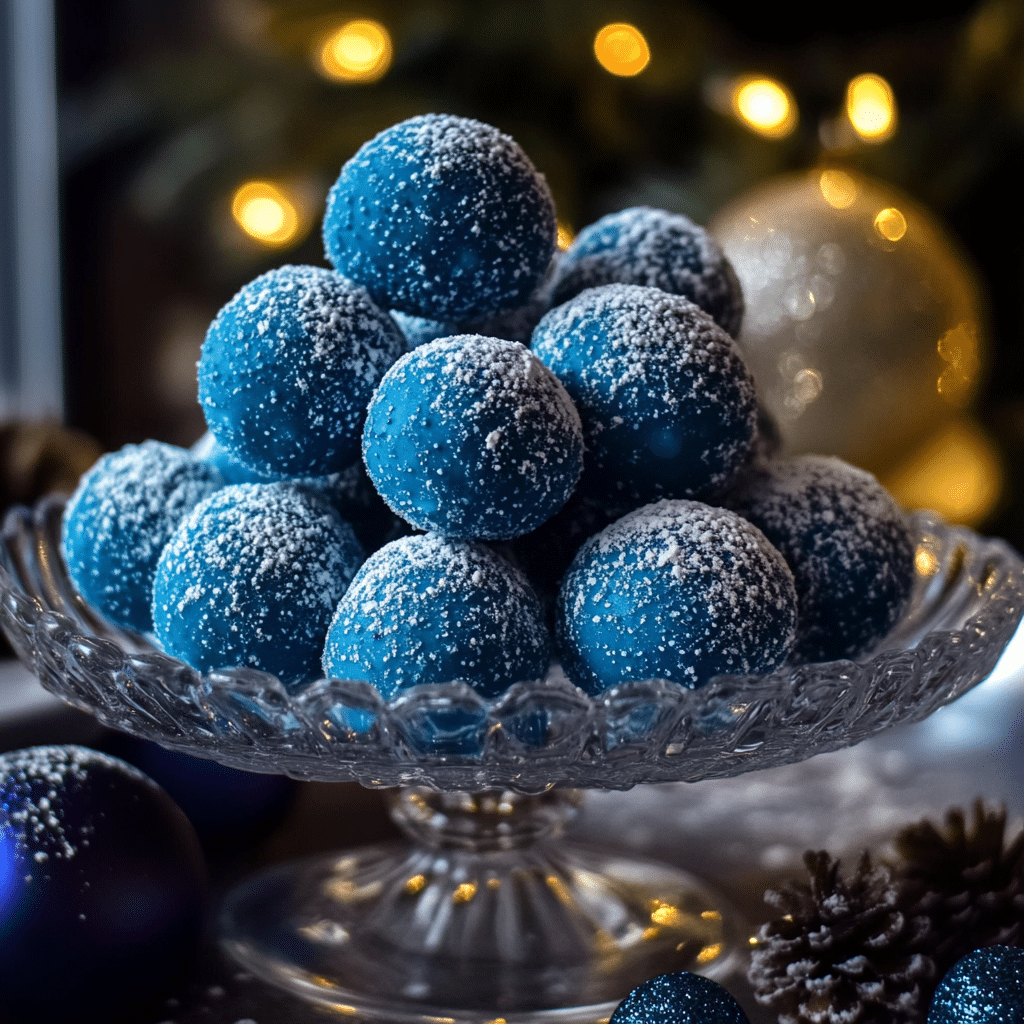
These truffles are rich, decadent, and come with a festive twist thanks to the gorgeous blue coating that mimics the colors of winter. Picture this: a creamy center, a crispy, melt-in-your-mouth shell, and just the right amount of sweetness to keep you coming back for more. They’re the perfect combination of indulgence and elegance, making them the ideal treat to serve at Christmas parties or to package up for a thoughtful homemade gift.
I’ll never forget the first time I made these. I was in the kitchen with my family, and we wanted to make something extra special that felt both festive and fun. I decided to give truffles a try—and after a little experimenting, these beauties were born. The blue color came from a mix of white chocolate and a few simple additions, and honestly, the moment we tasted them, we all knew they were going to be a holiday staple.
So, whether you’re making these for a holiday party or just to treat yourself (you deserve it!), these Blue Christmas Truffles will be the perfect blend of holiday cheer and sweet satisfaction.
Why You’ll Love This Recipe
There’s a lot to love about these Blue Christmas Truffles, but let me break it down for you:
- Easy to Make: These truffles are so simple, you don’t need to be a baking pro to nail them. With only a few ingredients and minimal hands-on time, they’re perfect for beginners or anyone looking to make something stunning without too much fuss.
- Perfect for the Holidays: The vibrant blue coating makes them a standout treat at any holiday gathering. They’ll add a touch of elegance to your spread, and let’s be honest—who doesn’t love a treat that looks as good as it tastes?
- Rich and Indulgent: The combination of creamy white chocolate and smooth cream cheese in the filling makes these truffles melt in your mouth. Plus, the crunchy blue candy coating provides a perfect contrast to the smooth center. Each bite is like a holiday hug for your taste buds.
- Customizable: While the blue theme is perfect for Christmas, you can switch it up for other occasions by changing the coating color or adding a variety of sprinkles for an extra festive touch.
What really makes these truffles special, though, is their versatility. Whether you’re serving them as a sweet treat with your Christmas dinner, packing them into cute gift boxes, or just indulging in a few after a busy day, these truffles will be your new favorite holiday indulgence.
Preparation Time and Servings
- Total Time: 2 hours (includes chilling time)
- Preparation Time: 20 minutes
- Cooking Time: None—just chilling!
- Servings: 18-24 truffles (depending on size)
Nutrition Facts: (Per truffle)
- Calories: 120
- Protein: 1g
- Carbs: 15g
- Fat: 7g
- Sugar: 12g
Ingredients
Here’s what you’ll need for these sweet, festive treats:
- 1 cup white chocolate chips (for the truffle coating)
- 8 oz cream cheese, softened (adds the smooth, creamy texture to the filling)
- 1/4 cup powdered sugar (adds sweetness without being overwhelming)
- 1 tsp vanilla extract (for that hint of warm, comforting flavor)
- 1/2 cup blue candy melts (for the beautiful blue coating)
- Sprinkles (optional): You can add holiday-themed sprinkles to give your truffles an extra festive touch.
Why These Ingredients Are Key:
- White Chocolate Chips: This forms the base of the creamy truffle filling. It melts down smoothly and pairs perfectly with the tanginess of the cream cheese.
- Cream Cheese: Not only does it create that luscious truffle texture, but it balances the sweetness of the white chocolate for a truly irresistible flavor.
- Candy Melts: These are perfect for coating truffles, as they harden quickly to give you that perfect candy shell that’s both beautiful and delicious.
- Vanilla Extract: Just a little splash of vanilla elevates the flavor and brings all the sweetness together.
Step-by-Step Instructions
Step 1: Prepare the Truffle Filling
- Start by melting your white chocolate chips. You can do this in the microwave by heating them in 20-second intervals, stirring between each, or by using a double boiler to melt them slowly and evenly.
- Once the white chocolate is melted, let it cool for just a minute, so it doesn’t melt the cream cheese. Then, in a medium bowl, combine the softened cream cheese, powdered sugar, and vanilla extract. Mix until smooth and creamy. It should be thick and a little fluffy.
- Slowly fold in the melted white chocolate into the cream cheese mixture. Keep stirring gently until everything is well combined. The result should be a smooth, creamy mixture that’s not too runny but still easy to work with.
Step 2: Chill the Mixture
- At this point, you’ll need to chill the mixture so it firms up enough to roll into truffles. Cover the bowl with plastic wrap and place it in the refrigerator for about 30 minutes or until it’s firm to the touch.
Step 3: Form the Truffles
- After the mixture has chilled, it’s time to roll the truffles! Using a spoon or a small cookie scoop, portion out about a tablespoon of the chilled mixture. Roll it gently between your hands to form small balls. You can make them as large or small as you like, but keep in mind that bite-sized truffles are usually the best.
- Place each truffle on a baking sheet lined with parchment paper. Once they’re all rolled, pop them back in the fridge for another 30 minutes so they firm up a bit more.
Step 4: Prepare the Blue Coating
- While your truffles are chilling, it’s time to melt the blue candy melts. You can do this in the microwave or double boiler, just like the white chocolate earlier. Stir until smooth and melted, and let it cool slightly before dipping.
Step 5: Coat the Truffles
- Once your truffles are fully chilled, it’s time to coat them in that beautiful blue candy melt. Using a fork or a skewer, dip each truffle into the melted candy coating, ensuring that it’s fully covered. Tap off any excess by gently tapping the fork on the side of the bowl.
- Return the coated truffles to the parchment-lined baking sheet. If you’re feeling extra festive, sprinkle a few holiday sprinkles on top before the candy coating hardens.
Step 6: Let the Coating Set
- Once all the truffles are coated, let them set at room temperature for about 30 minutes, or until the candy coating hardens. If you’re in a rush, you can place the truffles in the fridge for about 10 minutes to speed up the process.

How to Serve
These Blue Christmas Truffles are perfect for all kinds of holiday festivities. Here are a few ideas on how to serve them:
- Gift them: Package them in cute gift boxes for a thoughtful and delicious homemade present.
- Holiday Party: Arrange them on a platter with a few other sweet treats for a festive dessert spread.
- As a treat with coffee: These truffles pair beautifully with a warm mug of coffee or hot chocolate. You could even serve them alongside some cookies or biscotti for a cozy, treat-filled afternoon.
- On a Dessert Table: These blue beauties will stand out on a holiday dessert table next to cakes, cookies, and other festive treats.
Additional Tips
- Chill the mixture well: Make sure your cream cheese and white chocolate mixture is nice and firm before rolling into truffles. If it’s too soft, the truffles won’t hold their shape.
- Don’t skip the fridge time: Chilling the truffles before coating them ensures they stay firm while you dip them. It also gives the flavors a chance to meld together.
- Use a candy thermometer: If you’re having trouble with the candy melts, a candy thermometer can help you get the right temperature for smooth dipping.
- Go slow with the candy melts: The blue candy coating can harden quickly, so work fast but carefully to coat the truffles completely.
- Have fun with toppings: Don’t be afraid to get creative with your sprinkles! Silver, gold, or white snowflake sprinkles make these even more magical.
Recipe Variations
Here are a few fun variations you can try to make your Blue Christmas Truffles uniquely yours:
- Chocolate Coating: If you prefer a more traditional flavor, swap the blue candy coating for dark or milk chocolate. You could even drizzle the chocolate over the truffles for a fancy look.
- Add a Flavor Twist: Incorporate a teaspoon of orange zest or peppermint extract into the cream cheese filling for a refreshing twist.
- Nutty Truffles: Add some chopped pecans or hazelnuts into the truffle mixture for an extra crunch.
- Alcohol Infused: A tablespoon of rum or Baileys in the filling would add a festive kick that pairs wonderfully with the creamy white chocolate.
Serving Suggestions
These truffles are perfect for holiday gatherings, but here are some other ways to serve them:
- Pair with a Hot Beverage: Serve these with a hot cup of spiced cider or Christmas-themed tea for a cozy treat.
- As a Party Favor: Package them in small bags tied with ribbon for cute party favors.
- Add to a Dessert Table: Arrange them alongside other holiday treats like sugar cookies, fudge, or gingerbread men.
- For Kids: Serve these truffles with a side of warm milk for a special holiday treat.
Freezing and Storage
Storage: Store leftover Blue Christmas Truffles in an airtight container at room temperature for up to one week. Keep them away from direct sunlight to prevent the candy coating from softening.
Freezing: You can also freeze the truffles for up to three months. Just make sure to place them on a baking sheet in a single layer and freeze until solid. Then transfer them to a freezer-safe container or bag. To defrost, leave them at room temperature for about an hour.
Special Equipment
- Baking Sheet with Parchment Paper: This helps prevent the truffles from sticking to the surface.
- Cookie Scoop: For even-sized truffles.
- Candy Thermometer (optional): To ensure the candy coating is at the right temperature for dipping.
FAQ Section
- Can I use store-bought white chocolate chips? Yes! Store-bought white chocolate chips will work perfectly. Just make sure to melt them slowly to prevent burning.
- Can I make these ahead of time? Yes, you can make these truffles a day or two in advance. Just store them in an airtight container at room temperature.
- What if I don’t like blue? No worries! You can swap out the blue candy melts for any color that fits your holiday theme. Red, green, or even gold would work beautifully!

Blue Christmas Truffles
- Total Time: 2 hours
Ingredients
Here’s what you’ll need for these sweet, festive treats:
- 1 cup white chocolate chips (for the truffle coating)
- 8 oz cream cheese, softened (adds the smooth, creamy texture to the filling)
- 1/4 cup powdered sugar (adds sweetness without being overwhelming)
- 1 tsp vanilla extract (for that hint of warm, comforting flavor)
- 1/2 cup blue candy melts (for the beautiful blue coating)
- Sprinkles (optional): You can add holiday-themed sprinkles to give your truffles an extra festive touch.
Why These Ingredients Are Key:
- White Chocolate Chips: This forms the base of the creamy truffle filling. It melts down smoothly and pairs perfectly with the tanginess of the cream cheese.
- Cream Cheese: Not only does it create that luscious truffle texture, but it balances the sweetness of the white chocolate for a truly irresistible flavor.
- Candy Melts: These are perfect for coating truffles, as they harden quickly to give you that perfect candy shell that’s both beautiful and delicious.
- Vanilla Extract: Just a little splash of vanilla elevates the flavor and brings all the sweetness together.
Instructions
Step 1: Prepare the Truffle Filling
- Start by melting your white chocolate chips. You can do this in the microwave by heating them in 20-second intervals, stirring between each, or by using a double boiler to melt them slowly and evenly.
- Once the white chocolate is melted, let it cool for just a minute, so it doesn’t melt the cream cheese. Then, in a medium bowl, combine the softened cream cheese, powdered sugar, and vanilla extract. Mix until smooth and creamy. It should be thick and a little fluffy.
- Slowly fold in the melted white chocolate into the cream cheese mixture. Keep stirring gently until everything is well combined. The result should be a smooth, creamy mixture that’s not too runny but still easy to work with.
Step 2: Chill the Mixture
- At this point, you’ll need to chill the mixture so it firms up enough to roll into truffles. Cover the bowl with plastic wrap and place it in the refrigerator for about 30 minutes or until it’s firm to the touch.
Step 3: Form the Truffles
- After the mixture has chilled, it’s time to roll the truffles! Using a spoon or a small cookie scoop, portion out about a tablespoon of the chilled mixture. Roll it gently between your hands to form small balls. You can make them as large or small as you like, but keep in mind that bite-sized truffles are usually the best.
- Place each truffle on a baking sheet lined with parchment paper. Once they’re all rolled, pop them back in the fridge for another 30 minutes so they firm up a bit more.
Step 4: Prepare the Blue Coating
- While your truffles are chilling, it’s time to melt the blue candy melts. You can do this in the microwave or double boiler, just like the white chocolate earlier. Stir until smooth and melted, and let it cool slightly before dipping.
Step 5: Coat the Truffles
- Once your truffles are fully chilled, it’s time to coat them in that beautiful blue candy melt. Using a fork or a skewer, dip each truffle into the melted candy coating, ensuring that it’s fully covered. Tap off any excess by gently tapping the fork on the side of the bowl.
- Return the coated truffles to the parchment-lined baking sheet. If you’re feeling extra festive, sprinkle a few holiday sprinkles on top before the candy coating hardens.
Step 6: Let the Coating Set
- Once all the truffles are coated, let them set at room temperature for about 30 minutes, or until the candy coating hardens. If you’re in a rush, you can place the truffles in the fridge for about 10 minutes to speed up the process.
- Prep Time: 20 minutes
Nutrition
- Serving Size: 24
- Calories: 120
- Sugar: 15g
- Fat: 7g
- Carbohydrates: 15g
- Protein: 1g
Conclusion
I hope you enjoy making these Blue Christmas Truffles as much as I do. They’re a great way to add some festive flair to your holiday season without spending all day in the kitchen. Whether you’re making them for a special occasion or as a treat for yourself, these little bites of joy will surely become a favorite holiday tradition.
Give them a try, and don’t forget to share your photos! I’d love to see your beautiful creations—tag me on Instagram, and let’s spread some holiday cheer together!
Happy holidays, and happy baking!

